



Browser API: User Documentation
Browser API is 2Captcha's cloud browser for automating sites that need a real browser: JavaScript rendering, clicks, forms, scrolling, geo-dependent content, proxies, and CAPTCHA handling.
You connect to the remote browser using a ready-made CDP WebSocket URL from your 2Captcha dashboard and control it with familiar tools: Playwright, Puppeteer, or any other client that supports the Chrome DevTools Protocol.
You don't need to run Chrome on your own server, maintain browser infrastructure, manually assemble proxy strings, or figure out the connection format. All the main parameters are configured in the Dashboard.
The documentation consists of three parts: the public API and the Captcha CDP interface for programmatic integration, a guide to working through the Dashboard, and the Cookie Import API for uploading cookies into a profile.
What is Browser API
Browser API launches a browser session in the 2Captcha cloud. Your code connects to this session via a WebSocket URL and controls the page just as if the browser were running locally.
Typical workflow:
- You open the Browser API Dashboard.
- Choose the country and proxy mode.
- Copy the ready-made CDP URL.
- Paste it into Playwright or Puppeteer.
- The script opens the site, performs actions, and gets the result.
When to use Browser API
Browser API is the right choice when a plain HTTP request isn't enough.
Use it if the site:
- renders content via JavaScript;
- loads data after the page has loaded;
- requires clicks, text input, scrolling, or waiting for elements;
- shows different pages depending on the country;
- uses checks, redirects, dynamic forms, or CAPTCHA;
- behaves unreliably with a plain request via
curl,requests,fetch, or similar tools.
What you get
With Browser API you can:
- run remote browser sessions;
- connect to them via Playwright, Puppeteer, and CDP clients;
- choose the session's country;
- use your own external proxy or a 2Captcha proxy account;
- generate a single CDP URL or a list of URLs for parallel work;
- view active sessions via Live;
- solve CAPTCHA within the browser scenario;
- track browser traffic usage.
Quick start: your first Browser API check
Try Browser API without creating a new browser account, configuring a proxy, or opening the Connection setup tab. On your first visit to the Browser API Dashboard, a demo browser account with a ready-made Default profile on IPv6 is already available. You can open it right away via Live, copy the ready CDP URL, and use that URL in a minimal code example.
After this quick start you will be able to:
- use the ready-made demo browser account;
- open the
Default profileviaLive; - copy the ready CDP URL from the account card or profile card;
- run a minimal connection example from code;
- understand when you need a separate profile with a proxy;
- move on to the advanced scenario in the 5 minute How-to section.
Before you start
Make sure you have a 2Captcha account and access to the Browser API section.
For the first check, you don't need to create a new browser account, add a proxy, or manually assemble a CDP URL. The Dashboard already has a demo account and a ready Default profile with IPv6. A separate profile with a proxy can be created later, when you need to test a real scraping or automation scenario.
Step 1. Open the Browser API Dashboard
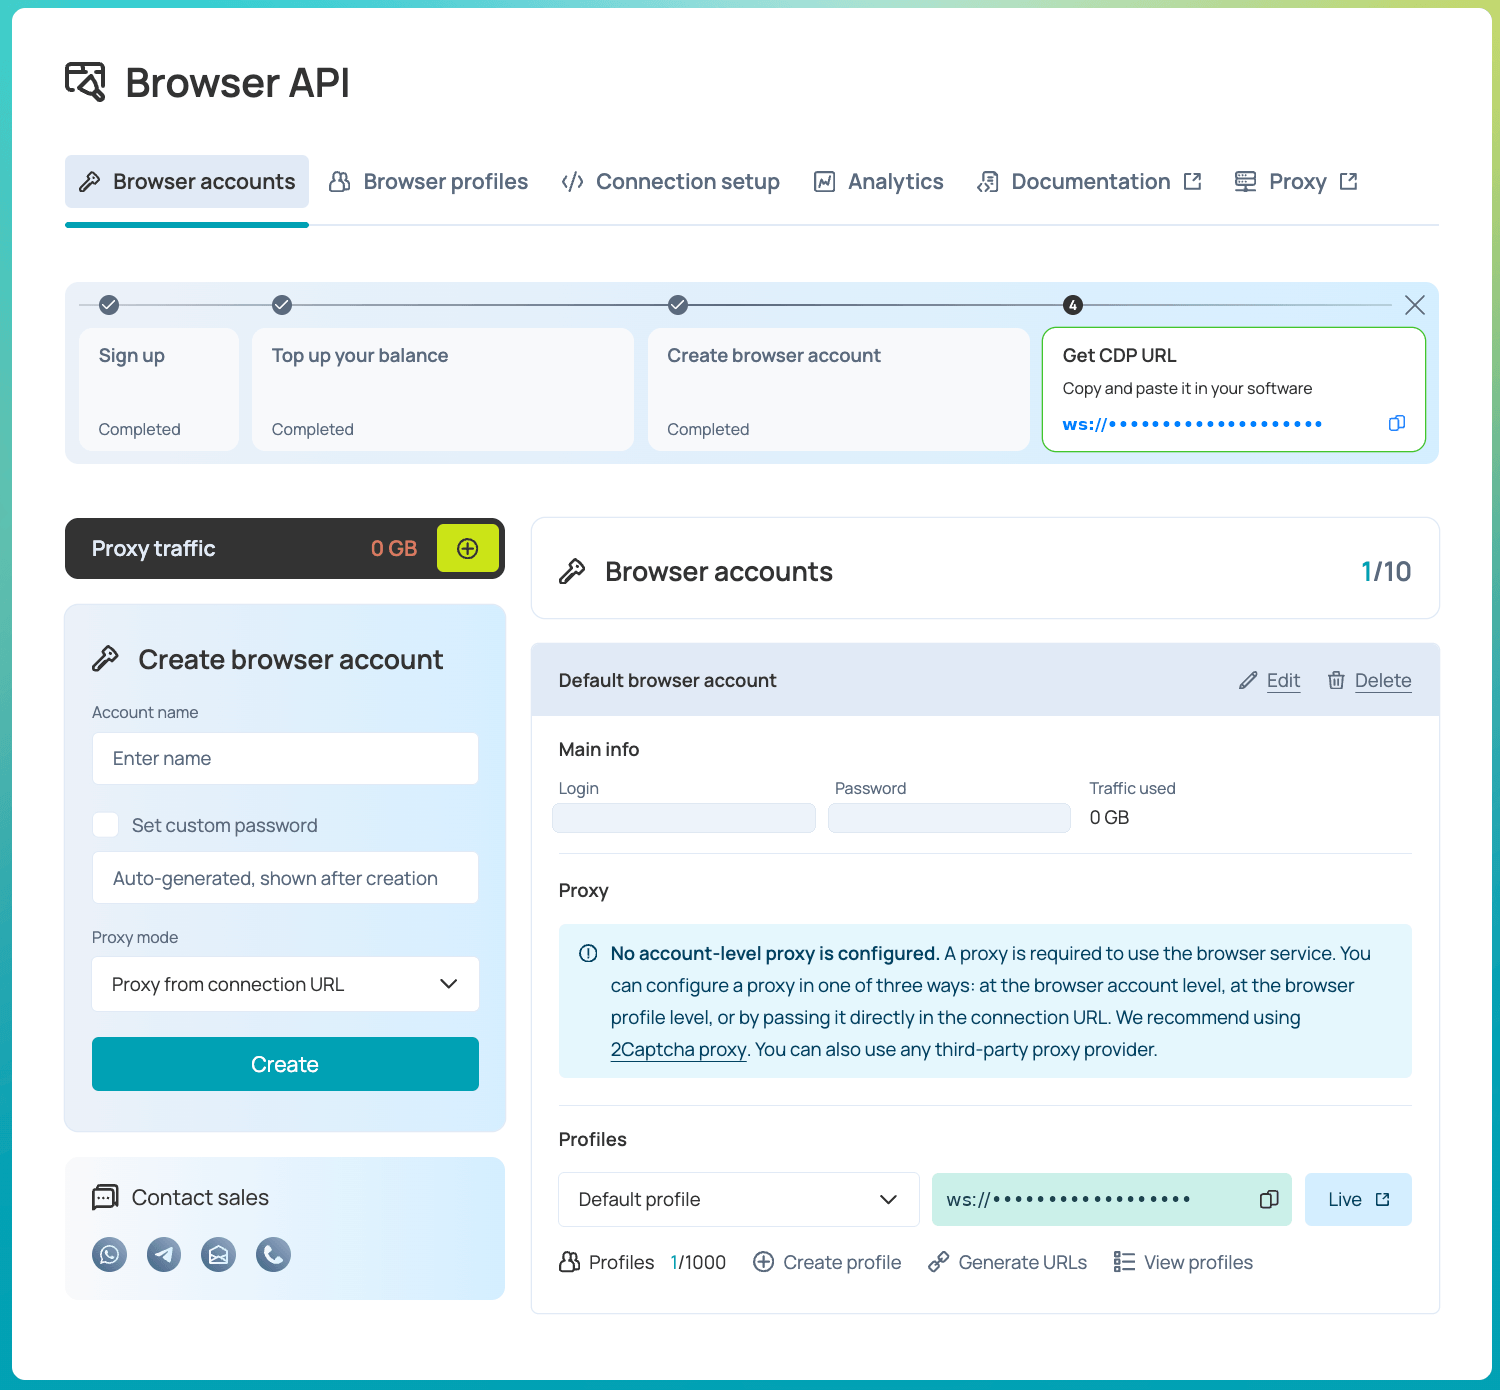
Go to the Browser API section. The first time you open the Dashboard, the Browser accounts tab is shown right away — this is the starting screen for a quick launch.
This page already shows browser accounts, profiles, ready CDP URLs, and buttons for launching a live session. For the first check, use the demo account shown in the account list.
Step 2. Use the ready-made demo account
The Browser accounts tab already shows a ready demo account. It's created automatically so you can try Browser API without setting up any infrastructure.
Inside the demo account there's a ready Default profile with IPv6. This profile is a good fit for the first test:
- open the cloud browser via
Live; - copy the CDP URL;
- confirm that Browser API is available;
- run the minimal code example;
- move on to configuring a profile with a proxy later, if you need one for a production scenario.
The demo account is convenient for getting started. For production scenarios, it's better to create a separate profile with the proxy, geo, and settings you need.
Step 3. Test the launch via Live
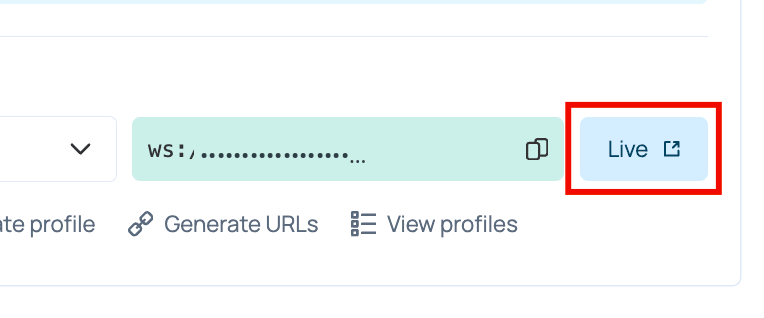
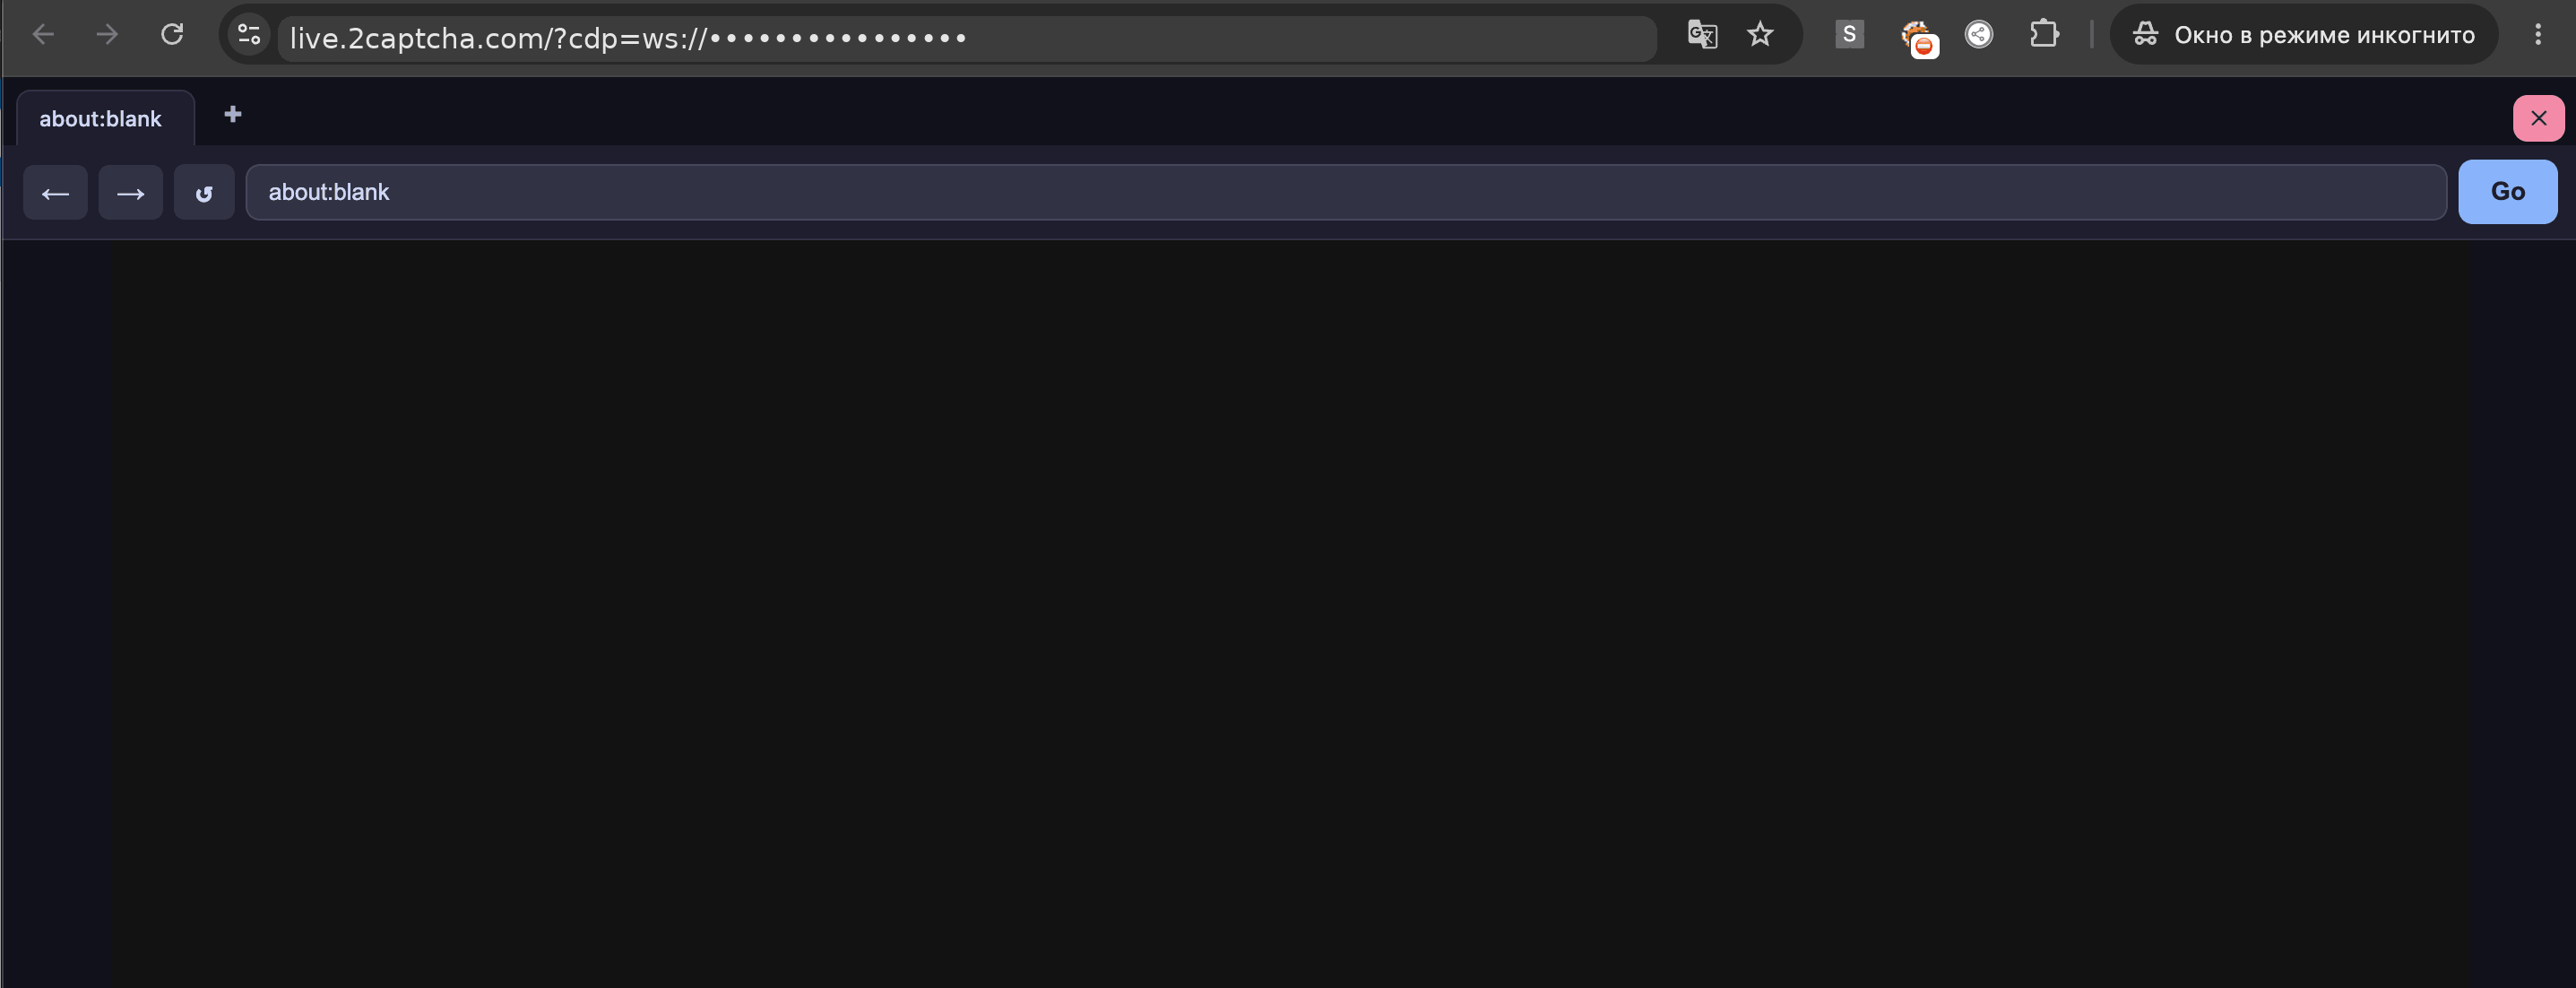
Click Live on the demo account card or on the Default profile card.
Live opens the cloud browser directly in the interface. It's the fastest way to confirm that the account and profile are working correctly, even before running any code.
If the live session opens, Browser API is working and ready to be connected to from code.
Step 4. Copy the ready CDP URL
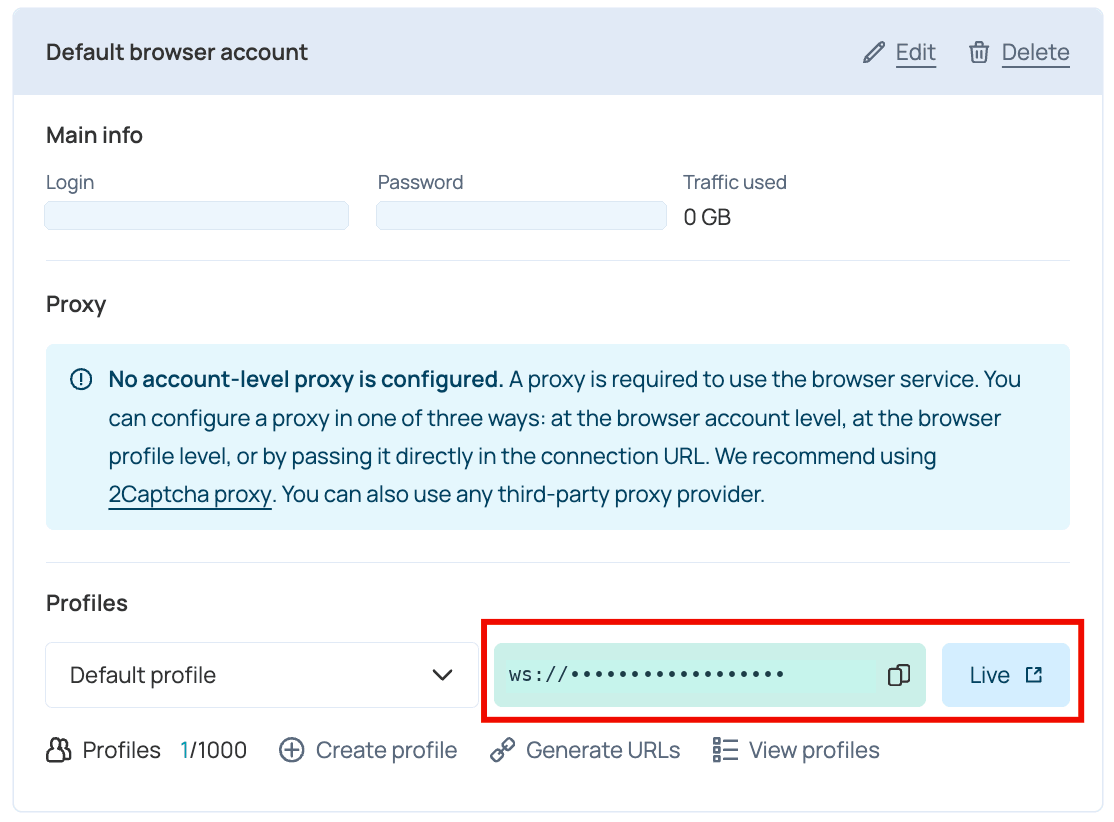
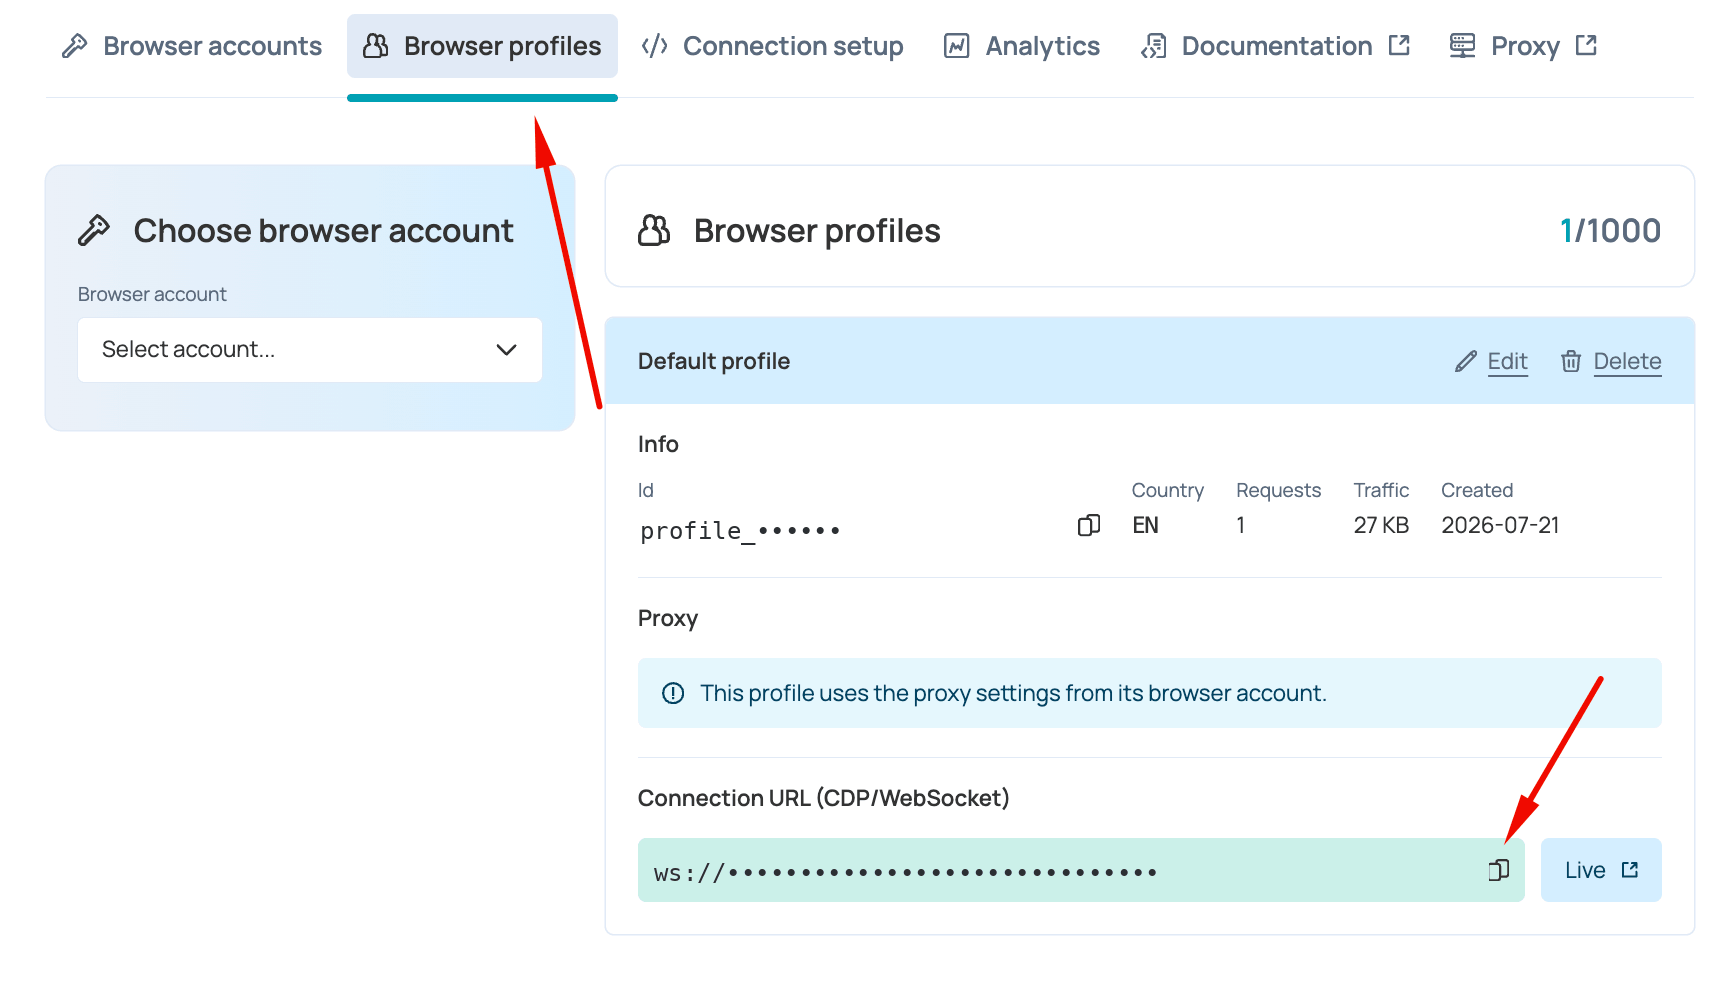
The CDP URL is already available in the interface. There's nothing to generate manually.
You can copy the URL from two places:
- from the browser account card;
- from a specific browser profile card.
For the first check, you can use the CDP URL of the demo account or the Default profile.
For a real scenario, it's better to copy the CDP URL from the card of the specific profile you need. That makes it easier to track which profile is being used going forward: the demo Default profile, a profile with a proxy, a profile for a specific country, or a separate profile for a project.

Step 5. Run the minimal code example
At this step, you don't need to go to the Connection setup tab. Use the CDP URL you copied from the account card or Default profile.
Save the CDP URL to an environment variable.
macOS/Linux:
bash
export BROWSER_API_CDP_URL="PASTE_CDP_URL_HERE"Windows PowerShell:
powershell
$env:BROWSER_API_CDP_URL="PASTE_CDP_URL_HERE"Option A. Puppeteer
Install the dependency:
bash
npm install puppeteer-coreCreate a file named quick-start.js:
javascript
const puppeteer = require('puppeteer-core');

const cdpUrl = process.env.BROWSER_API_CDP_URL;
const targetUrl = 'https://google.com';

async function main() {
  if (!cdpUrl) {
    throw new Error('BROWSER_API_CDP_URL is not set');
  }

  console.log('Connecting to Browser API...');

  const browser = await puppeteer.connect({
    browserWSEndpoint: cdpUrl,
  });

  const page = await browser.newPage();

  console.log(`Opening ${targetUrl}...`);
  await page.goto(targetUrl, {
    waitUntil: 'networkidle2',
    timeout: 60_000,
  });

  console.log('Title:', await page.title());

  await page.screenshot({
    path: 'quick-start.png',
    fullPage: true,
  });

  console.log('Screenshot saved to quick-start.png');

  await browser.disconnect();
}

main().catch((error) => {
  console.error('Error:', error.message);
  process.exit(1);
});
Run it:
bash
node quick-start.jsOption B. Playwright Python
Install the dependency:
bash
pip install playwrightCreate a file named quick_start.py:
python
import os
from playwright.sync_api import sync_playwright

cdp_url = os.environ.get("BROWSER_API_CDP_URL")
target_url = "https://google.com"

if not cdp_url:
    raise RuntimeError("BROWSER_API_CDP_URL is not set")

print("Connecting to Browser API...")

with sync_playwright() as p:
    browser = p.chromium.connect_over_cdp(cdp_url)
    context = browser.contexts[0]
    page = context.new_page()

    print(f"Opening {target_url}...")
    page.goto(target_url, wait_until="networkidle", timeout=60_000)

    print("Title:", page.title())

    page.screenshot(path="quick-start.png", full_page=True)
    print("Screenshot saved to quick-start.png")

    browser.close()
Run it:
bash
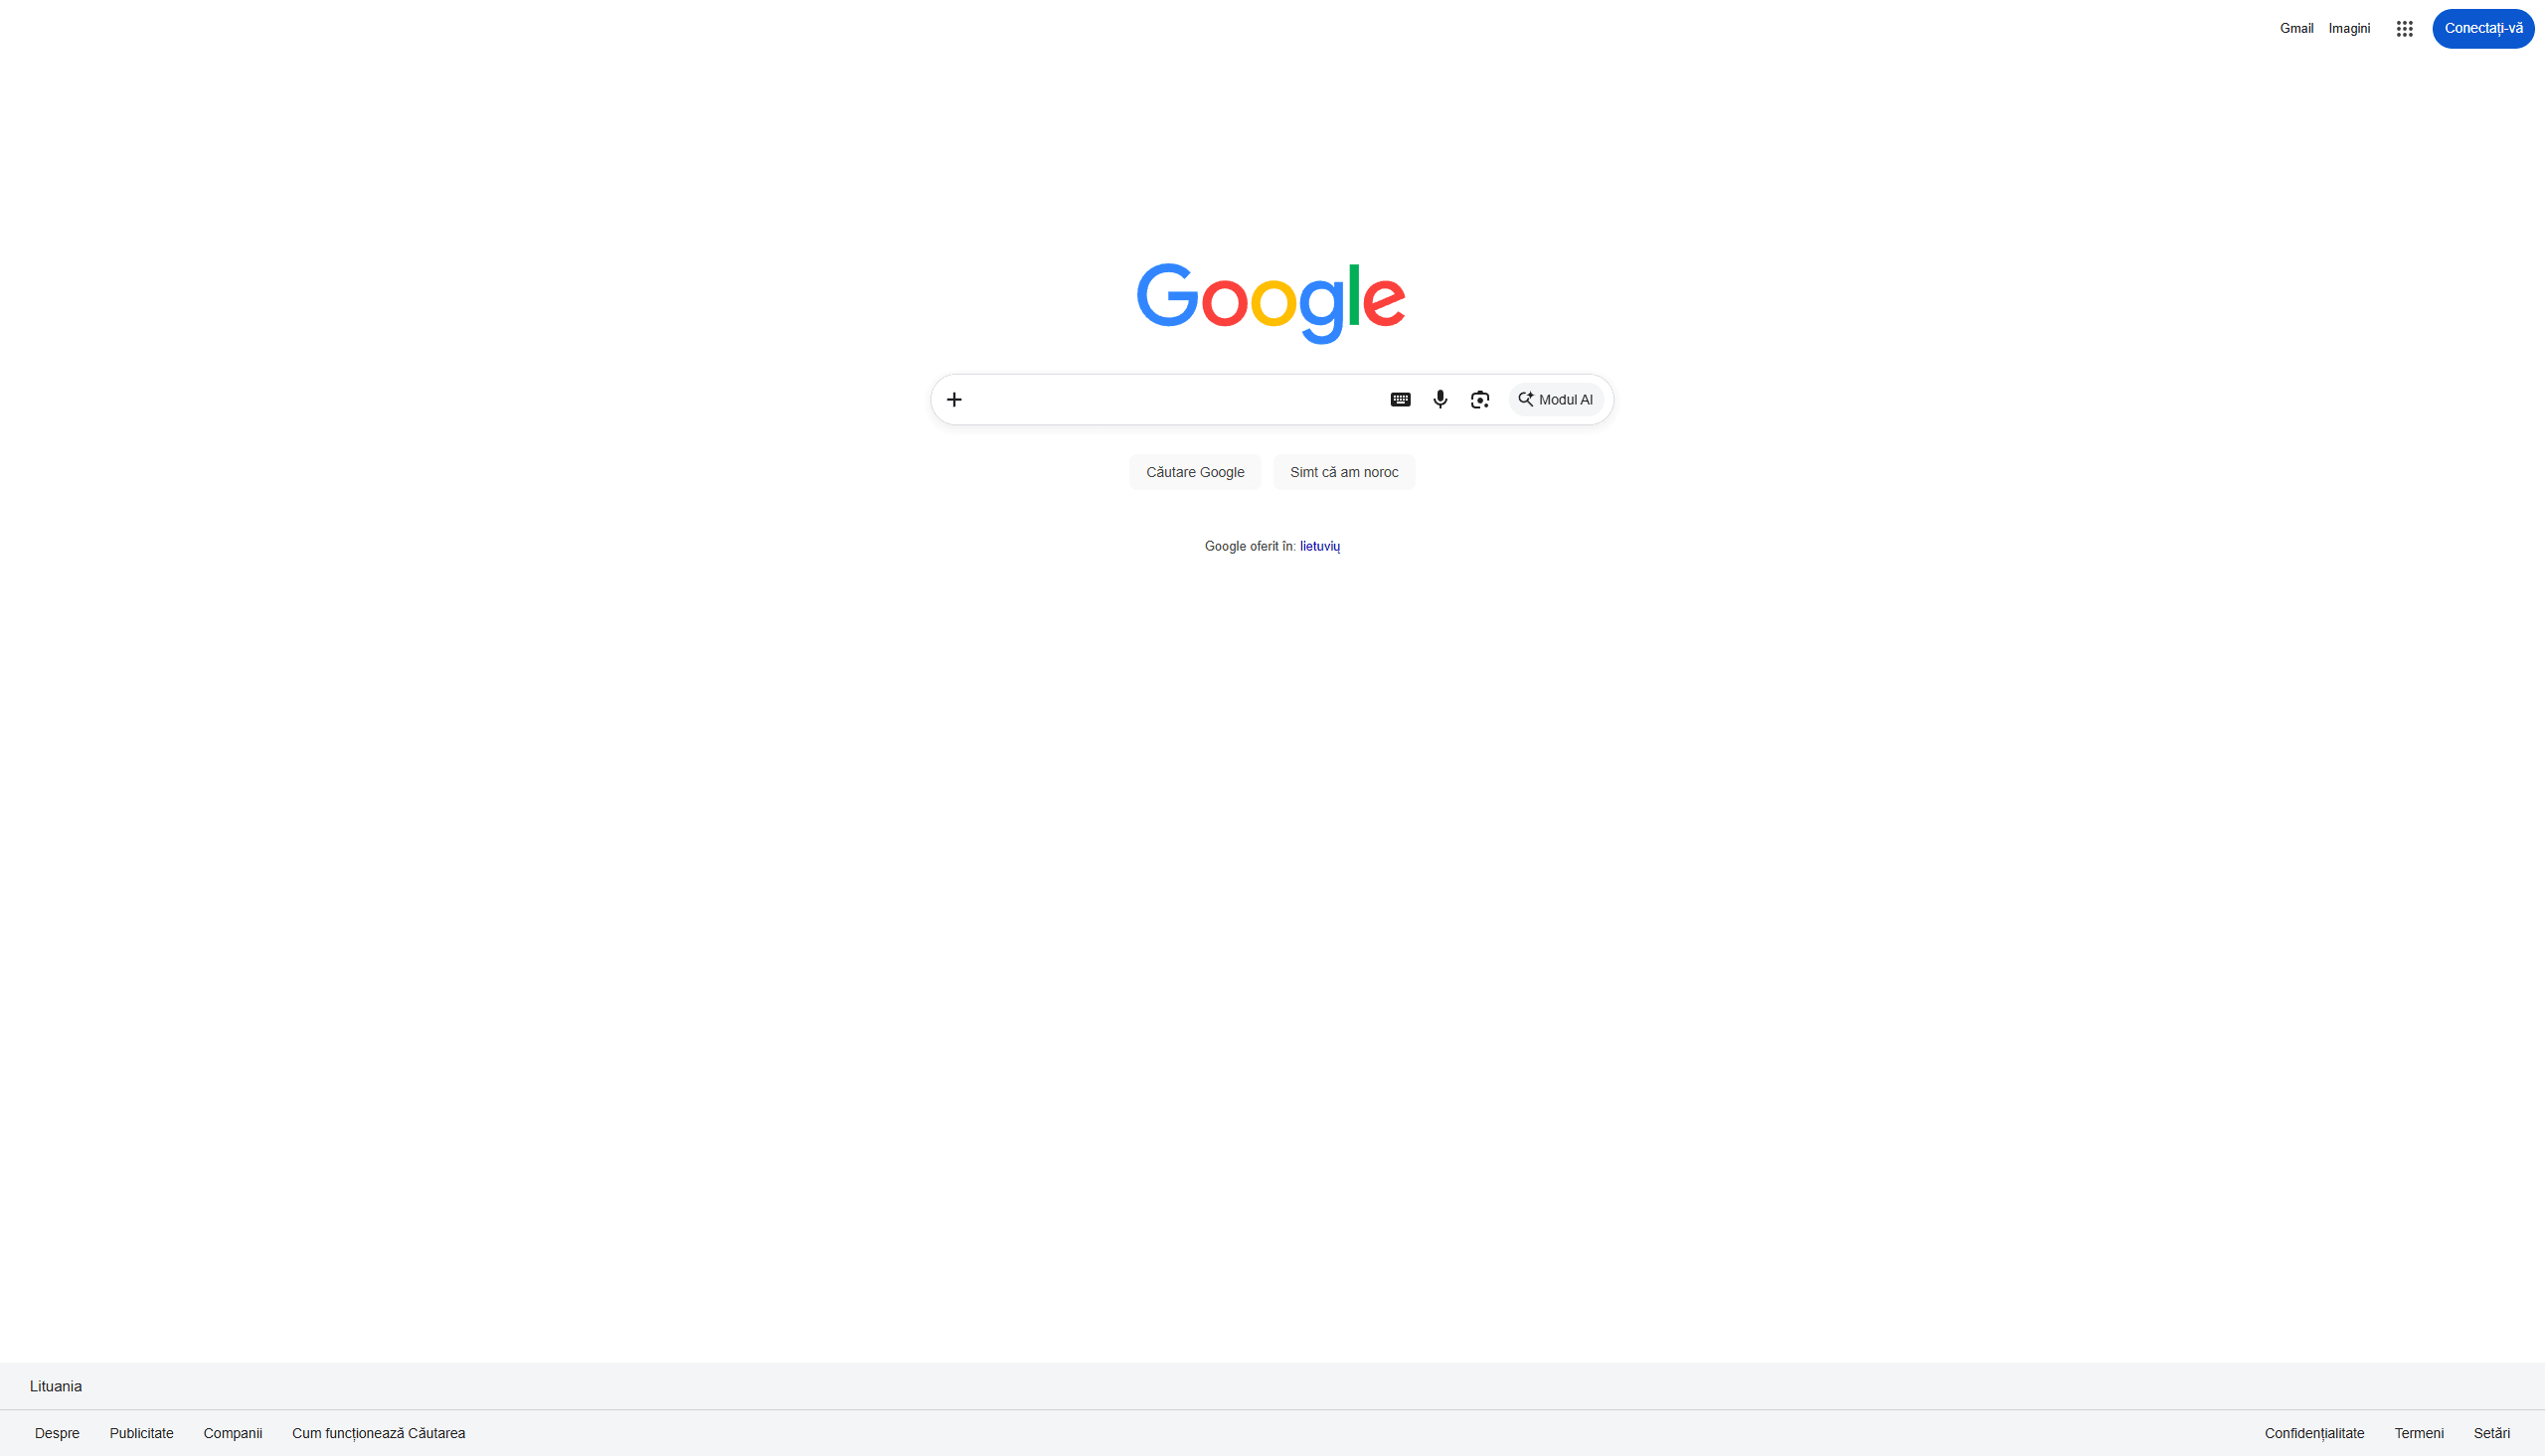
python quick_start.pyIf everything is set up correctly, the script will connect to the demo profile, open the page, and save a screenshot.

What's next
After the first check, move on to the production scenario: create a separate profile with a proxy, test it via Live, open the Connection setup tab, and run a browser session from the code example that accounts for proxy mode.
It's worth creating a profile with a proxy if you need to:
- use a specific country or region;
- connect a paid 2Captcha proxy;
- connect your own proxy provider;
- separate test and production scenarios;
- store different settings for different sites or projects.
This scenario is described in the 5 minute How-to section.
Optional: create a separate browser account
Creating a new browser account is not required for the first check. The demo account is enough to open Live, see the cloud browser, copy the CDP URL, and run the minimal code example.
A separate browser account is useful if you need to:
- separate projects;
- isolate environments;
- create separate credentials;
- separate test scenarios from production;
- store different groups of profiles separately.
In short
For the first check, use the shortest path:
- open the Browser API Dashboard;
- use the ready-made demo browser account;
- open the
Default profileviaLive; - copy the ready CDP URL from the account card or profile card;
- run the minimal code example directly with this CDP URL;
- move on to 5 minute How-to when you need a proxy and the example from the
Connection setuptab.
Browser API in 5 minutes: create a profile and run ready-made code
In Quick Start you tested Browser API using a demo account and the ready-made Default profile: you opened the browser via Live, copied the CDP URL, and ran a minimal example.
Now create your own profile in the same account and get ready-made code for it on the Connection Setup tab. Browser API will automatically add the selected account and profile parameters to the example — you won't need to assemble the CDP URL manually.
As a result, the script will connect to the new profile, open a test page, print its title to the terminal, and close the connection.
Time: about 5 minutes
What you'll need: a completed Quick Start and access to Browser API.
1. Go to the "Profiles" tab
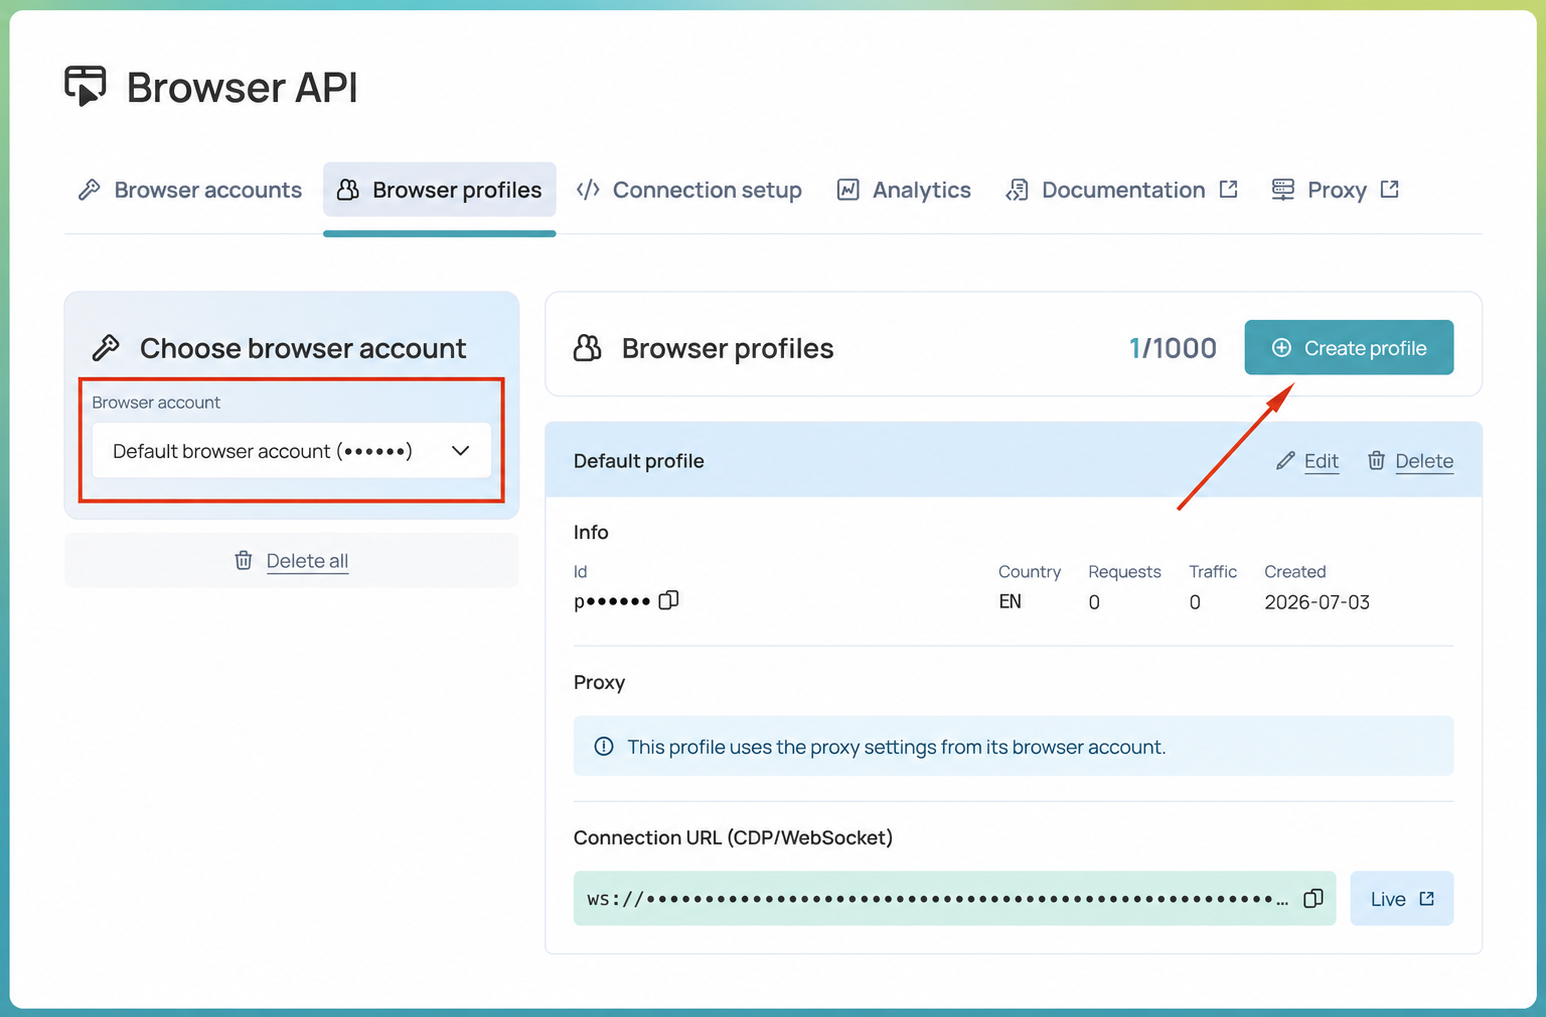
In your 2Captcha account, open Browser API → Browser profiles.
On the left, in the Select account block, choose the demo browser account you used in Quick Start (Default browser account). After selecting the account, the Create profile button will appear on the right, above the list of its profiles.
2. Create a profile
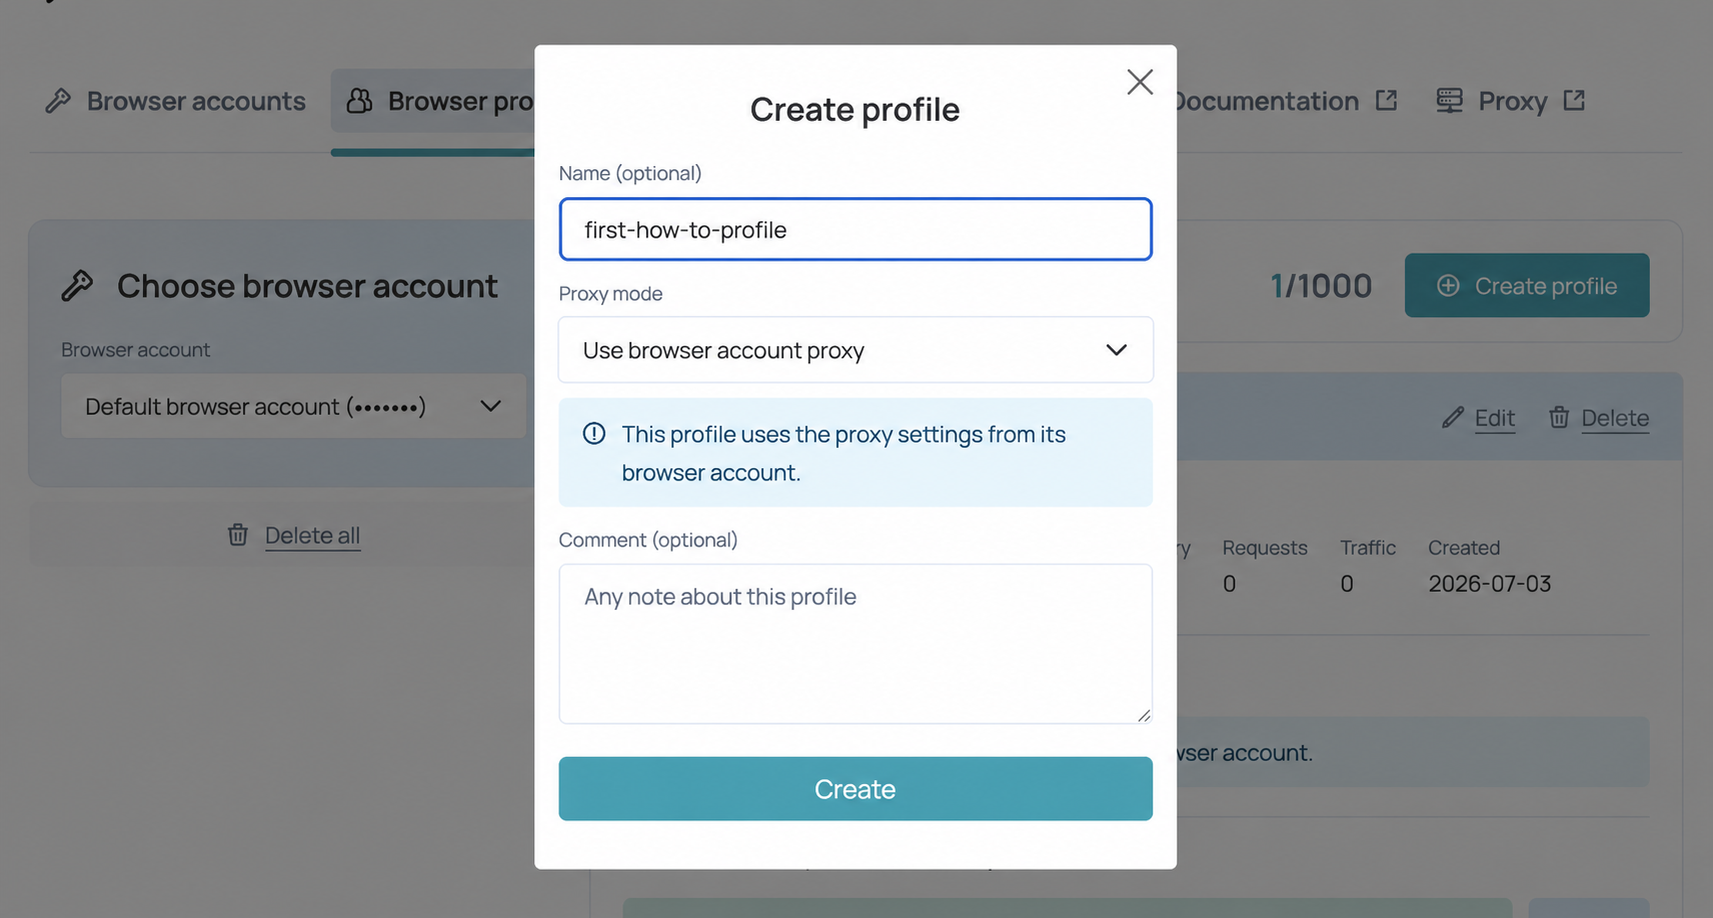
Click Create profile. In the form that opens:
- Enter a name, for example
first-how-to-profile. - In the Proxy mode field, select Use browser account proxy.
- Optionally, add a comment.
- Click Create.
The Name and Comment fields are optional, but a clear name will help you find the profile in the next step.
With the Use browser account proxy mode selected, the profile inherits the proxy settings of the browser account, so no additional parameters need to be specified.
The form also offers other modes:
- 2Captcha paid proxy — fields for selecting a proxy account, country, and IP lifetime appear;
- Custom proxy — you'll need to specify your own proxy parameters;
- Proxy in connection URL — proxy parameters are passed at connection time.
These options change the set of form fields, but they aren't needed for this scenario.
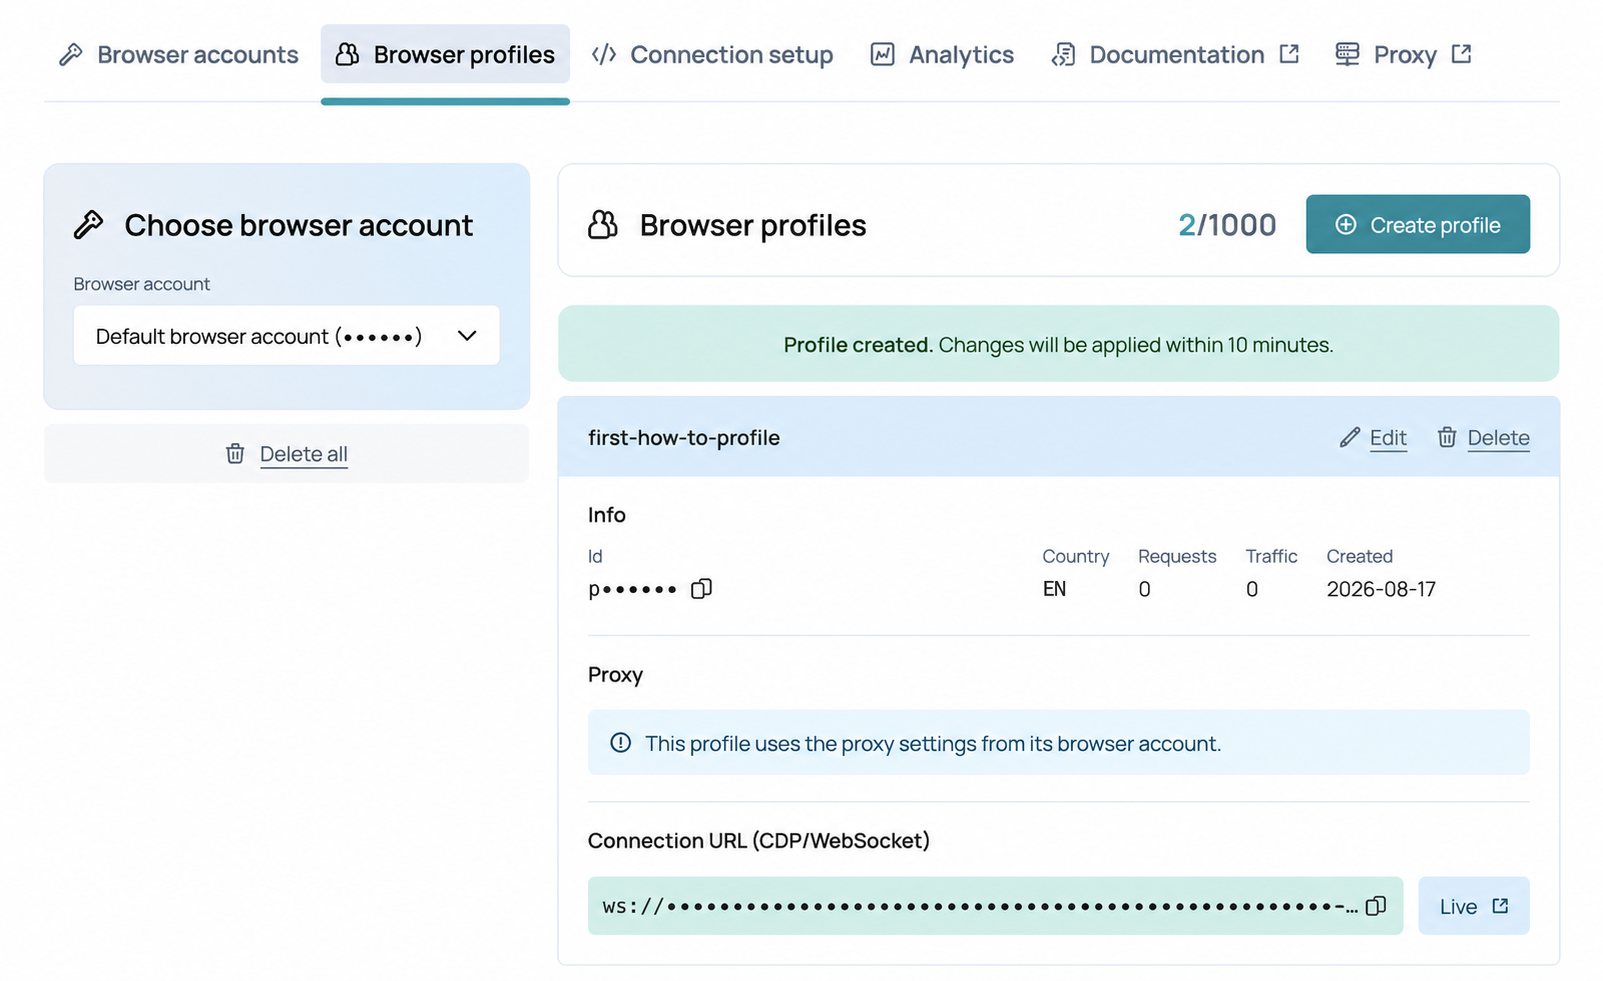
 After clicking **Create**, the form will close, and a success notification will appear on the **Browser profiles** tab. The new profile will be shown first in the profile list of the selected account.
Make sure the profile with the name you specified appears in the list. The notification may state that applying changes can take up to 10 minutes.
3. Open the connection setup
Go to the Connection Setup tab.
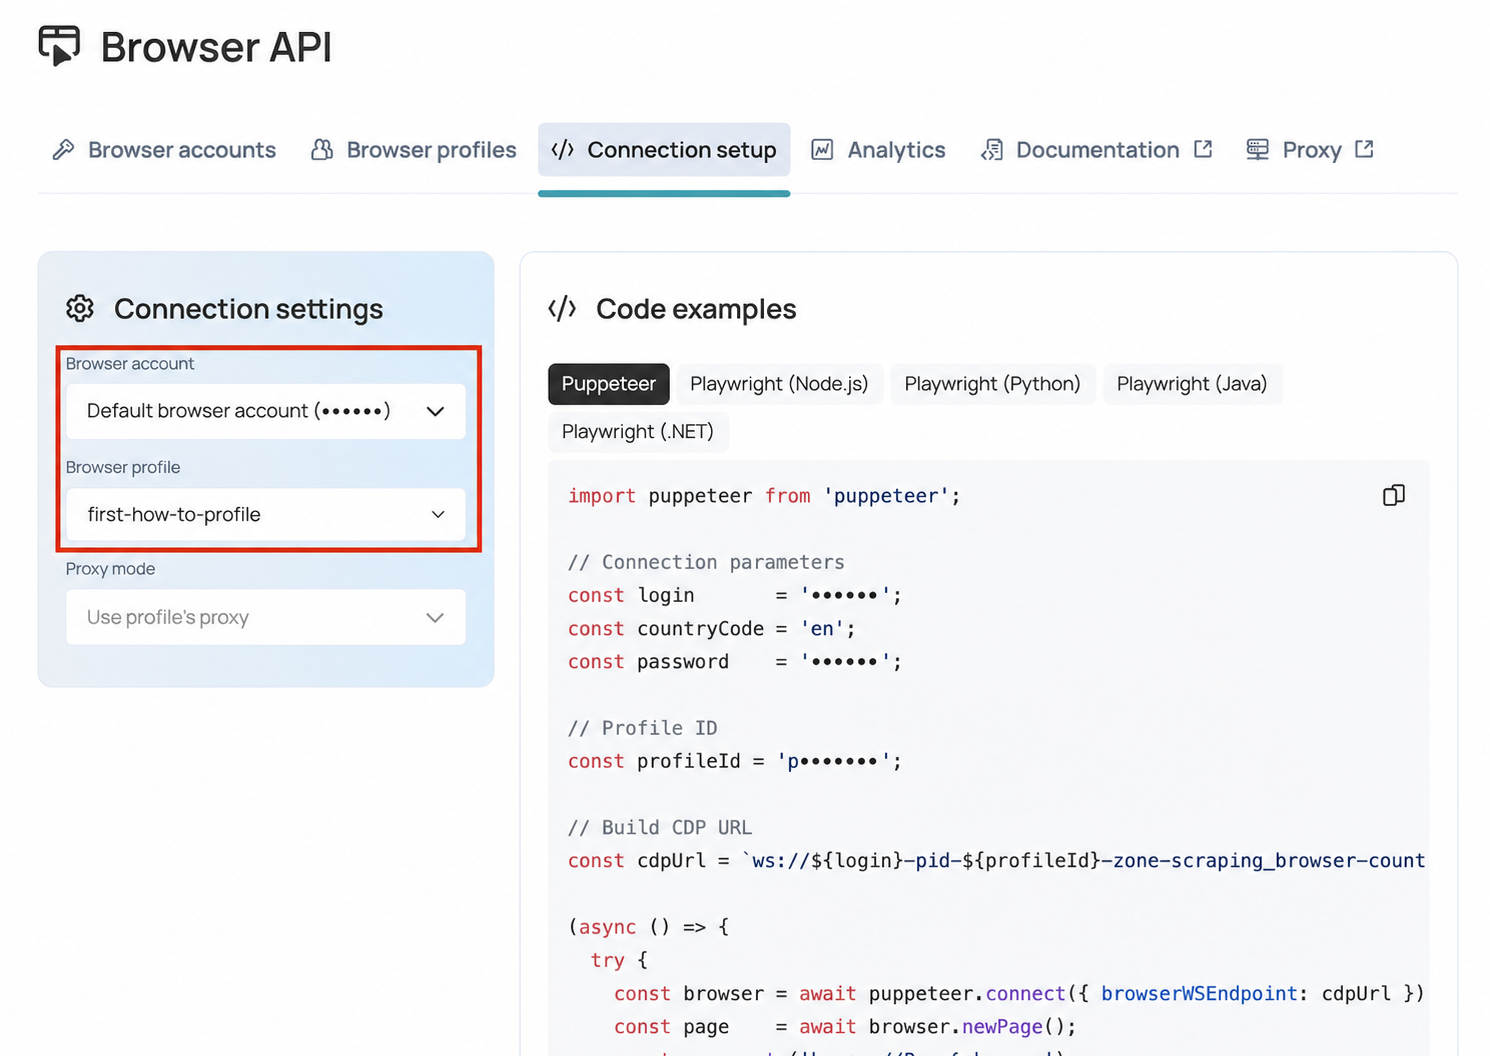
In the Connection parameters block on the left:
- In the Browser account field, select the same account.
- In the Browser profile field, select the profile created in the previous step.
After selecting an existing profile, the Proxy mode field will become unavailable and show the value Profile proxy is used. This means the code example uses the settings saved in the profile.
Do not select Generate new: in this scenario, the profile has already been created on the Browser profiles tab.
4. Choose a library and copy the code
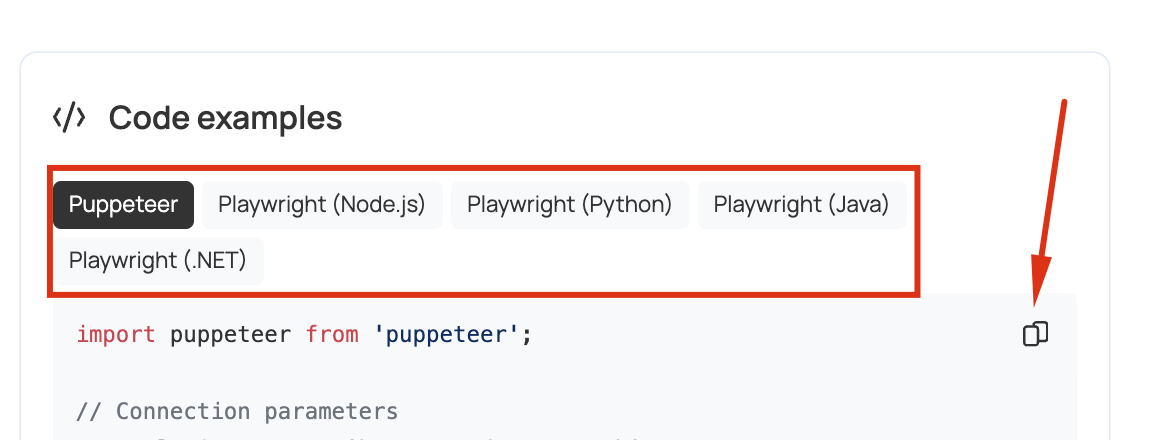
In the Code examples block, choose the library you used in Quick Start or use in your project:
- Puppeteer;
- Playwright (Node.js);
- Playwright (Python);
- Playwright (Java);
- Playwright (.NET).
After selecting a library, the example will update. Click the copy icon in the top-right corner of the code block.
The code already contains the parameters of the selected account and profile. There's no need to copy the CDP URL separately and paste it into the example manually.
 > **Important:** the ready-made example contains connection credentials. Don't publish it in full, don't add it to a public Git repository, and don't send it to logs.
5. Run the code
Save the copied code to a project file prepared in Quick Start. Make sure the corresponding dependency for the selected library is already installed.
The ready-made example uses https://2captcha.com as the test page. The created profile uses the IPv6 proxy of the demo account, which has restricted access to that site. Before running, replace the address in the navigation line:
js
await page.goto('https://example.com');example.com is a neutral test page suitable for verifying the connection. In a production scenario, specify a site you have the right to open automatically.
For Puppeteer, for example, save the code to index.mjs and run:
bash
node index.mjsIf you chose a different library, use its usual run command.
On a successful connection, the script will:
- connect to the cloud browser using the created profile;
- create a new page;
- open the URL specified in the example;
- print the page title to the terminal;
- close the connection.
For https://example.com, a successful result looks like this:
text
Title: Example DomainIf the run fails
- The "Create profile" button didn't appear: make sure a browser account is selected on the left of the Profiles tab.
- The created profile is missing from the list: check that the same account in which the profile was created is selected on the Connection Setup tab.
- Authorization error on connection: re-select the account and profile, then copy the updated code again.
- Library not found: install the dependency for the selected example in the same project you're running the code from.
- The page returned
401or403: check whether the site is accessible through the selected profile's proxy. This response isn't necessarily related to Browser API authorization. - The connection drops: check the account status, available traffic, and Browser API availability.
- The script doesn't finish: make sure the connection-closing command wasn't removed from the copied example.
What's next after this guide
In Quick Start and this guide, you worked with a demo browser account. The next step is to create your own browser account, choose a suitable proxy mode for it, and then add separate profiles for different projects or tasks.
Continue with the main Browser API documentation.
The main documentation also describes the available proxy modes, country configuration, working with a custom proxy, and managing the accounts and profiles you've created.
For a production project, move credentials out of the source code into environment variables, and add error handling and connection retries.
Public API and the Captcha CDP Interface
Documentation for users of the public 2Captcha Browser API and the CDP interface for controlling CAPTCHA solving inside the cloud browser.
Browser API lets you create and manage browser logins, browser profiles, proxy settings, limits, and traffic statistics, and get a ready-made WebSocket URL to connect to the cloud browser via the Chrome DevTools Protocol (CDP).
The Captcha CDP interface is available inside a connected browser session and lets you enable CAPTCHA auto-solving, trigger solving manually, and track solve events.
1. Basics
Base URL
text
https://api.2captcha.comAuthorization
All requests use a regular 2Captcha API key. The same key is used for CAPTCHA recognition, the Fingerprint API, the Proxy API, and the Browser API.
You can pass the key parameter in requests:
text
key=YOUR_API_KEYFor compatibility, clientKey is also supported:
text
clientKey=YOUR_API_KEYRequest format
GET methods accept parameters in the query string.
POST, PUT, and DELETE methods accept a JSON body and require the header:
http
Content-Type: application/jsonSuccessful response format
Successful responses contain:
json
{
  "status": "OK"
}
Additional data is returned in response fields: account, profiles, connectionUri, browserTraffic, statistics, and others, depending on the method.
Error format
json
{
  "errorCode": "ERROR_PROXY_REQUIRED",
  "error": "Proxy is required"
}
2. Quick Start
Step 1. Create a browser login
A browser login can be created without a saved proxy, and the proxy can be passed later when getting connectionUri.
bash
curl -X POST "https://api.2captcha.com/browser/accounts" \
  -H "Content-Type: application/json" \
  -d '{
    "key": "YOUR_API_KEY",
    "name": "My browser login",
    "proxyMode": "none"
  }'
Example response:
json
{
  "status": "OK",
  "account": {
    "id": 58,
    "login": "bc15b7f53510063b2593",
    "password": "browserPassword",
    "name": "My browser login",
    "proxyMode": "none",
    "connectionUri": "ws://bc15b7f53510063b2593-zone-scraping_browser-country-us-pid-p0123456789abcdef0123456789abcdef:browserPassword@cb.2captcha.com:9222"
  }
}
Save account.id. You'll need it to get connectionUri and to manage profiles.
Creating a browser login also automatically creates a Default profile. Its profileId is generated randomly and looks like p<random>, for example p0123456789abcdef0123456789abcdef. Don't construct the Default profile's ID from account.id yourself.
Step 2. Get the WebSocket URL to connect
bash
curl -X POST "https://api.2captcha.com/browser/connection" \
  -H "Content-Type: application/json" \
  -d '{
    "key": "YOUR_API_KEY",
    "accountId": 58,
    "customProxy": {
      "type": "http",
      "host": "1.1.1.1",
      "port": 8080,
      "login": "proxyuser",
      "password": "proxypass"
    }
  }'
Example response:
json
{
  "status": "OK",
  "connectionUri": "ws://bc15b7f53510063b2593-zone-scraping_browser-country-us-pid-p0123456789abcdef0123456789abcdef-proxy-aHR0cDovL3Byb3h5dXNlcjpwcm94eXBhc3NAMS4xLjEuMTo4MDgw:browserPassword@cb.2captcha.com:9222"
}
The /browser/connection method returns the ready-made URL and, if a new profileId is specified, immediately creates a profile record. The browser session itself isn't started yet: it begins once a client connects to the WebSocket URL.
Step 3. Connect via Playwright
js
import { chromium } from 'playwright';

const browser = await chromium.connectOverCDP(connectionUri);
const context = browser.contexts()[0];
const page = await context.newPage();

await page.goto('https://example.com');
Step 4. Connect via Puppeteer
js
import puppeteer from 'puppeteer-core';

const browser = await puppeteer.connect({
  browserWSEndpoint: connectionUri
});

const page = await browser.newPage();
await page.goto('https://example.com');
3. Proxy
Working without a saved proxy
At the moment, a browser login can be created with proxyMode: "none". Its Default profile is also created without a saved proxy and works through a free IPv6 proxy. A separately created profile with proxyMode: "none" works the same way.
Important: the IPv6 mode without an explicitly set proxy is temporary and will be disabled. For stable integration, configure a 2Captcha proxy, a saved
customProxy, or pass a proxy in the connection string in advance.
After the IPv6 fallback is disabled, if no proxy is found when connecting, browser authorization will return an error:
json
{
  "errorCode": "ERROR_PROXY_REQUIRED",
  "error": "Proxy is required"
}
proxyMode: "none" means that the browser login or profile has no saved proxy. While the IPv6 fallback is available, such a profile can work without another proxy. Once it's disabled, a proxy will need to be passed some other way.
Proxy modes for browser logins
| Value | Description |
|---|---|
our_proxy |
Uses the 2Captcha proxy account attached to the browser login. The exit country is set by the country field. |
custom_proxy |
Uses a custom proxy saved in the Browser API. |
none |
No proxy saved. A temporary IPv6 fallback is currently available; once it's disabled, a proxy will need to be passed when connecting or configured at the profile level. |
Proxy modes for profiles
Profiles support the same modes as browser logins, plus an inheritance mode:
| Value | Description |
|---|---|
inherit |
The profile uses the proxy settings of the parent browser login. |
our_proxy |
The profile uses a 2Captcha proxy account. |
custom_proxy |
The profile uses a saved custom proxy. |
none |
The profile has no saved proxy. While the IPv6 fallback is available, the profile works through it. |
Proxy selection priority
When authorizing the browser, a proxy is selected in this order:
- A custom proxy passed directly when getting
connectionUri, or embedded in the WebSocket URL. - Proxy settings saved on the profile.
- Proxy settings saved on the browser login.
If no proxy is found after checking all levels, the temporary IPv6 fallback is currently used. After it's disabled, the connection will be rejected with the ERROR_PROXY_REQUIRED error.
The customProxy object
json
{
  "type": "http",
  "host": "1.1.1.1",
  "port": 8080,
  "login": "proxyuser",
  "password": "proxypass"
}| Field | Type | Required | Description |
|---|---|---|---|
type |
string | yes | Proxy type: http, https, or socks5. |
host |
string | yes | Proxy host or IP address. |
port |
integer | yes | Proxy port. |
login |
string | no | Proxy login, if authorization is required. |
password |
string | no | Proxy password, if authorization is required. |
If the proxy doesn't require authorization, the login and password fields can be omitted.
Passing a proxy inside the WebSocket URL
A proxy can be embedded in the browser's username in base64url format.
Original proxy URL:
text
http://proxyuser:proxypass@1.1.1.1:8080Base64url:
text
aHR0cDovL3Byb3h5dXNlcjpwcm94eXBhc3NAMS4xLjEuMTo4MDgwUsername format:
text
{browserLogin}-zone-scraping_browser-country-{countryCode}-pid-{profileId}-dt-{deviceType}-clickcaptcha-proxy-{encodedProxy}The -dt-{deviceType}, -clickcaptcha (or -nocaptcha), and -proxy-{encodedProxy} segments are optional and are added to the username in this order, right after -pid-{profileId}:
-dt-{deviceType}— browser device type. Defaults towindows; you can specify-dt-android.-clickcaptcha— enables solving reCAPTCHA by clicking. A value-less flag.-nocaptcha— disables CAPTCHA solving. A value-less flag, mutually exclusive with-clickcaptcha.-proxy-{encodedProxy}— passes a custom proxy directly in the connection URL. Added last, right before the password.
The deviceType, clickcaptcha, and nocaptcha parameters are currently only passed via username segments when manually assembling the WebSocket URL. The POST /browser/connection method doesn't accept these fields.
Full WebSocket URL:
text
ws://bc15b7f53510063b2593-zone-scraping_browser-country-us-pid-profile_1-proxy-aHR0cDovL3Byb3h5dXNlcjpwcm94eXBhc3NAMS4xLjEuMTo4MDgw:browserPassword@cb.2captcha.com:9222Example of assembling the URL in JavaScript:
js
const proxy = 'http://proxyuser:proxypass@1.1.1.1:8080';
const encodedProxy = Buffer.from(proxy).toString('base64url');

const username = `${browserLogin}-zone-scraping_browser-country-${countryCode}-pid-${profileId}-proxy-${encodedProxy}`;
const connectionUri = `ws://${username}:${browserPassword}@cb.2captcha.com:9222`;
For scenarios that don't need deviceType, clickcaptcha, or nocaptcha, it's recommended to get a ready-made connectionUri via the POST /browser/connection method.
4. Browser API Account Status
GET /browser
Returns the status of the Browser API account: available and used traffic, browser login and profile limits, and proxy availability information.
http
GET /browser?key=YOUR_API_KEYExample:
bash
curl "https://api.2captcha.com/browser?key=YOUR_API_KEY"Example response:
json
{
  "status": "OK",
  "browserTraffic": {
    "totalKb": 1048576,
    "usedKb": 0,
    "availableKb": 1048576,
    "totalGb": 1,
    "usedGb": 0,
    "availableGb": 1
  },
  "accounts": {
    "count": 1,
    "max": 10,
    "unlimited": false
  },
  "profiles": {
    "count": 1,
    "maxPerAccount": 1000,
    "unlimited": false
  },
  "proxy": {
    "available": true,
    "count": 1,
    "attached": false
  }
}
Exceeding the browser login limit
If the number of browser logins has reached the accounts.max value, creating a new login (POST /browser/accounts) is rejected:
json
{
  "errorCode": "ERROR_MAX_ACCOUNTS",
  "error": "The maximum number of browser accounts cannot exceed 10",
  "maxAccounts": 10
}
The response additionally contains the maxAccounts field — this isn't part of the general error format (see section 1), but an extension specific to this code.
Exceeding the profile limit
If the number of profiles per browser login has reached the profiles.maxPerAccount value, creating a single new profile via POST /browser/profiles or POST /browser/connection is rejected:
json
{
  "errorCode": "ERROR_MAX_PROFILES",
  "error": "The maximum number of profiles per browser account cannot exceed 1000",
  "maxPerAccount": 1000
}
The response additionally contains the maxPerAccount field — as with ERROR_MAX_ACCOUNTS, this is an extension specific to this code.
In the Dashboard, bulk CDP URL generation works differently: a generated profile's record is created and starts counting toward the limit only after the first actual CDP connection. This deferred activation doesn't apply to creating profiles one at a time via the public API.
5. Browser Logins
A browser login (Browser Account) is the core entity of the Browser API. It's used to create browser profiles and to form the connectionUri used for connecting. In the Dashboard, this same entity is called a browser account — these are two names for the same object.
Don't confuse the browser login as an API entity with the login field in its JSON representation.
For example:
json
{
  "id": 58,
  "login": "bc15b7f53510063b2593",
  "password": "browserPassword"
}
Here:
- Browser Account (browser login) — the API entity itself;
login— the browser login used when connecting via CDP;password— the browser password used when connecting via CDP.
List of browser logins
http
GET /browser/accounts?key=YOUR_API_KEYExample:
bash
curl "https://api.2captcha.com/browser/accounts?key=YOUR_API_KEY"The browser login object in the response contains a nested profile field with the current connection profile. For a new account, this is initially the Default profile, but the field can later point to a different profile. Below is an abbreviated example of a new account where the current profile is the Default profile:
json
{
  "id": 1581,
  "login": "bc15b7f53510063b2593",
  "password": "browserPassword",
  "name": "My browser login",
  "status": 1,
  "country": "de",
  "proxyAccountId": 2,
  "proxyMode": "our_proxy",
  "profile": {
    "id": 12300,
    "accountId": 1581,
    "profileId": "p0123456789abcdef0123456789abcdef",
    "name": "Default profile",
    "country": "de",
    "proxyAccountId": null,
    "proxyMode": "inherit",
    "connectionUri": "ws://bc15b7f53510063b2593-zone-scraping_browser-country-de-pid-p0123456789abcdef0123456789abcdef:browserPassword@cb.2captcha.com:9222"
  },
  "profilesCount": 1,
  "connectionUri": "ws://bc15b7f53510063b2593-zone-scraping_browser-country-de-pid-p0123456789abcdef0123456789abcdef:browserPassword@cb.2captcha.com:9222"
}
profile.id is the numeric internal record ID. For CDP URLs and Browser API methods, use the string field profile.profileId. The Default profile has proxyMode: "inherit", so in the example it inherits the country de from the browser login.
Create a browser login
http
POST /browser/accounts
Content-Type: application/json
Create a login with a saved custom proxy
bash
curl -X POST "https://api.2captcha.com/browser/accounts" \
  -H "Content-Type: application/json" \
  -d '{
    "key": "YOUR_API_KEY",
    "name": "My browser login",
    "proxyMode": "custom_proxy",
    "customProxy": {
      "type": "http",
      "host": "1.1.1.1",
      "port": 8080,
      "login": "proxyuser",
      "password": "proxypass"
    }
  }'
Example response:
json
{
  "status": "OK",
  "account": {
    "id": 58,
    "login": "bc15b7f53510063b2593",
    "password": "browserPassword",
    "name": "My browser login",
    "proxyMode": "custom_proxy",
    "customProxy": {
      "type": "http",
      "host": "1.1.1.1",
      "port": 8080,
      "login": "proxyuser",
      "password": "proxypass"
    },
    "connectionUri": "ws://bc15b7f53510063b2593-zone-scraping_browser-country-us-pid-p0123456789abcdef0123456789abcdef:browserPassword@cb.2captcha.com:9222"
  }
}
Create a login with a 2Captcha proxy account
bash
curl -X POST "https://api.2captcha.com/browser/accounts" \
  -H "Content-Type: application/json" \
  -H "Accept: application/json" \
  -d '{
    "key": "YOUR_API_KEY",
    "name": "My browser login",
    "proxyMode": "our_proxy",
    "proxyAccountId": 2,
    "country": "fr"
  }'
Example response:
json
{
  "status": "OK",
  "account": {
    "id": 58,
    "login": "bc15b7f53510063b2593",
    "password": "browserPassword",
    "name": "My browser login",
    "country": "fr",
    "proxyAccountId": 2,
    "proxyMode": "our_proxy",
    "proxy": {
      "id": 2,
      "login": "proxyAccountLogin",
      "password": "proxyAccountPassword",
      "type": "http",
      "host": "eu.proxy.2captcha.com",
      "port": 2334,
      "sessionTime": 120
    },
    "profile": {
      "id": 12300,
      "accountId": 58,
      "profileId": "p0123456789abcdef0123456789abcdef",
      "name": "Default profile",
      "zone": "scraping_browser",
      "country": "fr",
      "proxyMode": "inherit",
      "connectionUri": "ws://bc15b7f53510063b2593-zone-scraping_browser-country-fr-pid-p0123456789abcdef0123456789abcdef:browserPassword@cb.2captcha.com:9222"
    },
    "profilesCount": 1,
    "connectionUri": "ws://bc15b7f53510063b2593-zone-scraping_browser-country-fr-pid-p0123456789abcdef0123456789abcdef:browserPassword@cb.2captcha.com:9222"
  }
}
The country field sets the exit country for the selected 2Captcha proxy account. Pass a lowercase two-letter country code, e.g. fr for France. The parameter applies when proxyMode: "our_proxy" and is included in the username of the resulting CDP URL, in the -country-{countryCode}- segment.
For example, for "country": "fr" the CDP URL contains -country-fr-:
text
ws://<browser_login>-zone-scraping_browser-country-fr-pid-<profile_id>:<browser_password>@cb.2captcha.com:9222Create a login without a saved proxy
json
{
  "key": "YOUR_API_KEY",
  "name": "My browser login",
  "proxyMode": "none"
}
Example response:
json
{
  "status": "OK",
  "account": {
    "id": 58,
    "login": "bc15b7f53510063b2593",
    "password": "browserPassword",
    "name": "My browser login",
    "proxyMode": "none",
    "connectionUri": "ws://bc15b7f53510063b2593-zone-scraping_browser-country-us-pid-p0123456789abcdef0123456789abcdef:browserPassword@cb.2captcha.com:9222"
  }
}
While the temporary IPv6 fallback is available (see section 3), the connectionUri from this response works even without an explicitly set proxy.
Update a browser login
http
PUT /browser/accounts
Content-Type: application/json
Example:
bash
curl -X PUT "https://api.2captcha.com/browser/accounts" \
  -H "Content-Type: application/json" \
  -d '{
    "key": "YOUR_API_KEY",
    "id": 58,
    "name": "Updated login",
    "proxyMode": "our_proxy",
    "proxyAccountId": 2,
    "country": "fr"
  }'
The country field can be passed to change the exit country. If country isn't passed on update, the current country is kept. This rule also applies when changing proxyAccountId: the proxy account changes, but the previously selected country stays the same.
Regenerate a browser login's password
json
{
  "key": "YOUR_API_KEY",
  "id": 58,
  "regeneratePassword": true
}
After regeneration, old WebSocket URLs with the previous password will no longer work for new connections.
Delete a browser login
http
DELETE /browser/accounts
Content-Type: application/json
Example:
bash
curl -X DELETE "https://api.2captcha.com/browser/accounts" \
  -H "Content-Type: application/json" \
  -d '{
    "key": "YOUR_API_KEY",
    "id": 58
  }'
6. Browser Profiles
A browser profile stores the settings of a specific browser environment within a browser login. One browser login can have multiple profiles.
Profile limits
- A profile supports only one active CDP connection at a time. Trying to connect to an already-occupied profile (for example, opening a second
connectionUrifor the same profile while the first one is still in use) is rejected with aprofile_lockederror. Wait for the current session to finish, or use a different profile. - A profile can be updated while a CDP connection is active. The current session will keep running with its previous settings until the connection ends.
- Maximum duration of a single browser session — 30 minutes.
- Profiles are stored for 90 days from creation, or until deleted by the user.
- In the web interface, the Default profile can be deleted if the browser login has another profile. The only or last remaining profile cannot be deleted. This restriction applies to the Dashboard; the behavior of
DELETE /browser/profilesis described separately below.
List of profiles
http
GET /browser/profiles?key=YOUR_API_KEY&accountId=58&page=1&limit=50Example:
bash
curl "https://api.2captcha.com/browser/profiles?key=YOUR_API_KEY&accountId=58&page=1&limit=50"Parameters:
| Parameter | Type | Required | Description |
|---|---|---|---|
key |
string | yes | 2Captcha API key. |
accountId |
integer | yes | Browser login ID. |
page |
integer | no | Page number. |
limit |
integer | no | Number of profiles per page. |
Create or update a profile
http
POST /browser/profiles
Content-Type: application/json
Example of a profile that inherits the proxy from the browser login:
bash
curl -X POST "https://api.2captcha.com/browser/profiles" \
  -H "Content-Type: application/json" \
  -d '{
    "key": "YOUR_API_KEY",
    "accountId": 58,
    "profileId": "profile_1",
    "name": "Profile 1",
    "proxyMode": "inherit"
  }'
When creating or updating a profile with proxyMode: "inherit", the parent browser login's proxy settings and country apply. When switching from another mode to inherit:
- the profile's own proxy settings are reset;
proxyAccountId,proxy, andcustomProxyon the profile object arenull, since the effective settings come from the account;- the profile's
countryfield takes the account's country; profileId, name, accumulated statistics, and creation date are preserved.
Example of a profile with separate 2Captcha proxy settings:
json
{
  "key": "YOUR_API_KEY",
  "accountId": 58,
  "profileId": "profile_1",
  "name": "Profile 1",
  "proxyMode": "our_proxy",
  "proxyAccountId": 2,
  "country": "fr"
}
With proxyMode: "our_proxy", the country field sets the exit country for the profile. If country is passed, the profile is created with the specified country. If country isn't passed, the profile inherits the country from the parent browser login's settings.
When creating a profile, or switching from another mode to our_proxy, the proxyAccountId field is required. If you pass only proxyMode: "our_proxy" without proxyAccountId, the API returns an error:
json
{
  "errorCode": "ERROR_PROXY_ACCOUNT_ID",
  "error": "proxyAccountId is required for our_proxy mode"
}
On a correct transition from none to our_proxy with the proxyAccountId field:
- the existing profile is updated without changing
profileId; proxyModechanges toour_proxy;proxyAccountIdand theproxyobject are populated with the selected 2Captcha proxy account's data;customProxystaysnull;- if
countryisn't passed, the profile's previous country is kept; - name, accumulated statistics, and creation date are preserved.
If you pass the same accountId and an existing profileId, the method updates the profile instead of creating a new one. When switching proxyMode from inherit to none:
profileId, name, accumulated statistics, and creation date are preserved;proxyAccountIdis reset tonull;proxyandcustomProxyare reset tonull;- the saved
countryvalue doesn't change.
In the Dashboard, a profile with proxyMode: "none" shows a warning: pass a proxy in the connection URL, otherwise a free IPv6 proxy will currently be used. This fallback will be disabled.
Example of a profile with a separate saved custom proxy:
json
{
  "key": "YOUR_API_KEY",
  "accountId": 58,
  "profileId": "profile_1",
  "name": "Profile 1",
  "proxyMode": "custom_proxy",
  "customProxy": {
    "type": "socks5",
    "host": "proxy.example.com",
    "port": 1080,
    "login": "proxyuser",
    "password": "proxypass"
  }
}
When creating a profile, or switching from another mode to custom_proxy, the customProxy object is required. If you pass proxyMode: "custom_proxy" without customProxy data, the API returns an error:
json
{
  "errorCode": "ERROR_CUSTOM_PROXY",
  "error": "customProxy is required for custom_proxy mode"
}
On a correct transition to custom_proxy:
- the existing profile is updated without changing
profileId; proxyModechanges tocustom_proxy;proxyAccountIdis reset tonull;- the
proxyobject is reset tonull; - the passed data is saved into
customProxy; - the profile's previous
country, name, statistics, and creation date are preserved.
With proxyMode: "custom_proxy", the actual exit country is determined by the external proxy itself. The saved country field, the country shown on the profile card, and the -country-{countryCode}- segment in the CDP URL don't override customProxy's geography and may not match the real exit country.
Delete a profile
http
DELETE /browser/profiles
Content-Type: application/json
Delete a single profile:
json
{
  "key": "YOUR_API_KEY",
  "accountId": 58,
  "profileId": "profile_1"
}
Delete all profiles of a browser login and recreate a Default profile:
json
{
  "key": "YOUR_API_KEY",
  "accountId": 58,
  "deleteAll": true
}
A browser login can't be left without a profile. When the last profile is deleted programmatically, the API resets its data and creates a new Default profile with a new random profileId.
This rule applies in both cases:
- if the last profile was a custom one, it's replaced by a new Default profile;
- if the account only had a Default profile, it's reset and replaced by a new Default profile.
In both cases, the old profileId is no longer usable. Get the new profileId from the updated browser login data.
7. 2Captcha Proxy Accounts
Browser API can use 2Captcha proxy accounts purchased or connected by the user.
List of proxy accounts
http
GET /browser/proxy_accounts?key=YOUR_API_KEYExample:
bash
curl "https://api.2captcha.com/browser/proxy_accounts?key=YOUR_API_KEY"Example response:
json
{
  "status": "OK",
  "proxy": {
    "available": true,
    "data": [
      {
        "id": 2,
        "login": "u895ed2e43b5c04bf",
        "password": "qwerty123456",
        "type": "http",
        "zone": "custom",
        "host": "eu.proxy.2captcha.com",
        "port": 2334,
        "sessionTime": 120,
        "status": 1
      }
    ]
  }
}
Use the id from the response as proxyAccountId in the browser login or profile settings.
8. Getting connectionUri
POST /browser/connection
The method returns a ready-made WebSocket URL for a browser login or profile. If a new profileId is passed in the request, the profile is created in the database right away and counts toward the profile limit.
http
POST /browser/connection
Content-Type: application/json
Use the saved proxy settings:
json
{
  "key": "YOUR_API_KEY",
  "accountId": 58,
  "profileId": "profile_1"
}
The profileId parameter can be omitted:
json
{
  "key": "YOUR_API_KEY",
  "accountId": 58
}
In this case, the method uses the profile from the current account.profile field. This isn't necessarily the Default profile: if account.profile points to a different profile, that profile's profileId will be included in connectionUri. In the response, the selected profile is also returned in the top-level profile field.
Use a custom proxy just for this connection:
json
{
  "key": "YOUR_API_KEY",
  "accountId": 58,
  "profileId": "profile_1",
  "customProxy": {
    "type": "http",
    "host": "1.1.1.1",
    "port": 8080,
    "login": "proxyuser",
    "password": "proxypass"
  }
}
Example response:
json
{
  "status": "OK",
  "connectionUri": "ws://bc15b7f53510063b2593-zone-scraping_browser-country-us-pid-profile_1-proxy-aHR0cDovL3Byb3h5dXNlcjpwcm94eXBhc3NAMS4xLjEuMTo4MDgw:browserPassword@cb.2captcha.com:9222"
}
Important: creating the profile record doesn't start a browser session. The session begins once Playwright, Puppeteer, or another CDP client connects to connectionUri.
9. Traffic History and Statistics
Traffic operation history
http
GET /browser/history?key=YOUR_API_KEY&limit=50Example:
bash
curl "https://api.2captcha.com/browser/history?key=YOUR_API_KEY&limit=50"Traffic statistics
http
GET /browser/statistics?key=YOUR_API_KEY&dateFrom=2026-07-01&dateTo=2026-07-31Optional filters:
| Parameter | Type | Description |
|---|---|---|
accountId |
integer | Filter by browser login. |
profileId |
string | Filter by profile. |
Example:
bash
curl "https://api.2captcha.com/browser/statistics?key=YOUR_API_KEY&accountId=58&dateFrom=2026-07-01&dateTo=2026-07-31"10. Common Browser API Error Codes
| Code | When it occurs |
|---|---|
ERROR_KEY_DOES_NOT_EXIST |
The API key isn't passed or is missing. |
ERROR_WRONG_USER_KEY |
An invalid API key was passed. |
ERROR_ACCOUNT_NOT_FOUND |
Browser login not found. |
ERROR_MAX_ACCOUNTS |
The browser login count limit (accounts.max in GET /browser) has been reached. The response additionally contains the maxAccounts field. |
ERROR_MAX_PROFILES |
The profile-per-login count limit (profiles.maxPerAccount in GET /browser) has been reached. The response additionally contains the maxPerAccount field. |
ERROR_PROFILE_NOT_FOUND |
Profile not found. |
ERROR_PROXY_ACCOUNT_ID |
The required proxyAccountId wasn't passed for our_proxy mode. |
ERROR_PROXY_ACCOUNT_NOT_FOUND |
2Captcha proxy account not found. |
ERROR_PROXY_REQUIRED |
No proxy was found for the connection. |
ERROR_CUSTOM_PROXY |
The required customProxy object wasn't passed for custom_proxy mode. |
ERROR_CUSTOM_PROXY_TYPE |
Invalid custom proxy type. |
ERROR_CUSTOM_PROXY_HOST |
Invalid custom proxy host. |
ERROR_CUSTOM_PROXY_PORT |
Invalid custom proxy port. |
ERROR_CUSTOM_PROXY_AUTH |
Custom proxy authorization error. |
ERROR_INSUFFICIENT_FUNDS |
Insufficient funds or available resource for the operation. |
profile_locked |
The profile is already in use by an active CDP connection. See section 6, "Profile limits," for details. |
Captcha CDP Interface
11. Purpose
The Captcha CDP domain lets you control CAPTCHA solving on the cloud browser's current tab.
Two modes are available:
- Auto-solve after the page loads.
- Manual solve trigger via the
Captcha.solvecommand.
CDP events let you track progress: CAPTCHA detection, sending the request to the service, successful solving, or an error.
12. Connecting to a CDP Session
Playwright
js
import { chromium } from 'playwright';

const browser = await chromium.connectOverCDP(connectionUri);
const context = browser.contexts()[0];
const page = await context.newPage();
const session = await context.newCDPSession(page);
Puppeteer
js
import puppeteer from 'puppeteer-core';

const browser = await puppeteer.connect({
  browserWSEndpoint: connectionUri
});

const page = await browser.newPage();
const session = await page.target().createCDPSession();
13. CDP Data Types
CaptchaOptions
One element of the options array. Usually a single object is passed.
json
{
  "type": "*",
  "submitForm": false,
  "selector": ".captcha-container",
  "detectSelector": ".captcha-container",
  "responseSelector": "textarea[name=\"g-recaptcha-response\"]"
}| Field | Type | Description |
|---|---|---|
type |
string | CAPTCHA type. You can pass * for automatic detection. |
submitForm |
boolean | Submit the form after getting the token. |
submitSelector |
string | CSS selector of the form's submit button. |
selector |
string | CSS selector of the CAPTCHA container. |
detectSelector |
string | CSS selector used to detect the CAPTCHA. |
responseSelector |
string | CSS selector of the field where the token should be written. |
sitekeyAttributes |
string[] | Attributes that can be used to get the sitekey. |
actionAttributes |
string[] | Attributes that can be used to get the action for reCAPTCHA v3. |
SolveResult
The response of the Captcha.solve command, returned in the result field.
json
{
  "result": {
    "status": "solveFinished",
    "token": "03AGdBq26..."
  }
}| Field | Type | Description |
|---|---|---|
status |
string | Result status: solveFinished, solveFailed, notDetected, invalid. |
token |
string | Token on successful solving. |
errorMessage |
string | Error text on unsuccessful solving. |
14. CDP Commands
Captcha.setAutoSolve
Enables or disables automatic CAPTCHA solving on the tab.
js
await session.send('Captcha.setAutoSolve', {
  autoSolve: true,
  options: [
    {
      type: '*'
    }
  ]
});
Parameters:
| Parameter | Type | Required | Description |
|---|---|---|---|
autoSolve |
boolean | yes | true — solve CAPTCHA after the page loads; false — don't solve automatically, use only Captcha.solve. |
options |
CaptchaOptions[] |
no | CAPTCHA search and solve settings. |
Response: no body on success.
Possible CDP error:
text
No active frameCaptcha.solve
Triggers explicit CAPTCHA solving on the current tab.
js
const response = await session.send('Captcha.solve', {
  detectTimeout: 15000,
  options: [
    {
      type: '*'
    }
  ]
});

console.log(response.result.status);
console.log(response.result.token);
Parameters:
| Parameter | Type | Required | Description |
|---|---|---|---|
detectTimeout |
integer | no | CAPTCHA detection timeout, in milliseconds. The internal response limit is roughly detectTimeout + 10s; if not passed, about 60s is used. |
options |
CaptchaOptions[] |
no | CAPTCHA search and solve parameters. |
Example successful response:
json
{
  "result": {
    "status": "solveFinished",
    "token": "03AGdBq26..."
  }
}
Example result if the CAPTCHA isn't found:
json
{
  "result": {
    "status": "notDetected"
  }
}
Possible CDP errors without a SolveResult:
text
No active frame
Captcha.solve timed out waiting for extension response
15. CDP Events
Subscribing in Playwright:
js
session.on('Captcha.detected', () => {
  console.log('CAPTCHA detected');
});

session.on('Captcha.waitForSolve', () => {
  console.log('CAPTCHA sent to solver');
});

session.on('Captcha.solveFinished', () => {
  console.log('CAPTCHA solved');
});

session.on('Captcha.solveFailed', () => {
  console.log('CAPTCHA solve failed');
});
Events:
| Event | Description |
|---|---|
Captcha.detected |
CAPTCHA detected on the page. |
Captcha.waitForSolve |
Request sent to the service, awaiting a response. |
Captcha.solveFinished |
CAPTCHA solved successfully. |
Captcha.solveFailed |
Solving ended with an error. |
Event chain in auto mode:
text
Captcha.detected → Captcha.waitForSolve → Captcha.solveFinished | Captcha.solveFailedEvents are for tracking progress. The token is only returned in the response of the Captcha.solve command.
16. Recommended CDP Scenarios
Auto-solving CAPTCHA
Use auto-solve if you need the browser to solve CAPTCHA on its own after the page loads.
js
await session.send('Captcha.setAutoSolve', {
  autoSolve: true,
  options: [{ type: '*' }]
});

const solved = new Promise((resolve, reject) => {
  session.once('Captcha.solveFinished', resolve);
  session.once('Captcha.solveFailed', reject);
});

await page.goto('https://example.com');
await solved;
Recommended order:
text
Captcha.setAutoSolve({ autoSolve: true, options })
  → navigate to the page with the CAPTCHA
  → wait for the Captcha.solveFinished or Captcha.solveFailed event
In auto mode, you don't need to retrieve and apply the token yourself: it's written to the page automatically, and the form is submitted automatically if needed (see responseSelector and submitForm in CaptchaOptions, section 13). The events only let you track when solving is done; the token itself isn't passed in any event.
Manual Solve Trigger
Use the manual trigger if you need to control when solving starts and get the token in the command's response.
js
await session.send('Captcha.setAutoSolve', {
  autoSolve: false,
  options: [{ type: '*' }]
});

await page.goto('https://example.com');
await page.waitForTimeout(5000);

const { result } = await session.send('Captcha.solve', {
  detectTimeout: 15000,
  options: [{ type: '*' }]
});

if (result.status === 'solveFinished') {
  console.log('Token:', result.token);
} else {
  console.log('Captcha solve status:', result.status, result.errorMessage);
}
Recommended order:
text
Captcha.setAutoSolve({ autoSolve: false, options })
  → navigation
  → 3–5 second pause, so the widget has time to register
  → Captcha.solve({ detectTimeout, options })
  → check result.status
Don't call Captcha.solve from the Captcha.detected handler. The detected event means the widget has already been found; for manual mode, a single Captcha.solve call after a short pause is enough.
17. CDP Timeouts
| Timeout | Recommendation |
|---|---|
| Browser's internal timeout | detectTimeout + 10s, or about 60s if detectTimeout isn't passed. |
| Client timeout | Set it to at least detectTimeout + 120–180s to account for the wait time for a response from 2Captcha. |
| Maximum browser session duration | 30 minutes (see section 6, "Profile limits"). Take this into account when choosing detectTimeout and the client timeout, so CAPTCHA solving doesn't run past the session's lifetime. |
If your CDP client has its own timeout for the session.send command, increase it for Captcha.solve — otherwise the client may abort the wait before the service returns a result.
18. Full Example: Browser API + Playwright + CAPTCHA Auto-Solve
js
import { chromium } from 'playwright';

const API_KEY = 'YOUR_API_KEY';

async function createConnectionUri() {
  const response = await fetch('https://api.2captcha.com/browser/connection', {
    method: 'POST',
    headers: {
      'Content-Type': 'application/json'
    },
    body: JSON.stringify({
      key: API_KEY,
      accountId: 58,
      profileId: 'profile_1',
      customProxy: {
        type: 'http',
        host: '1.1.1.1',
        port: 8080,
        login: 'proxyuser',
        password: 'proxypass'
      }
    })
  });

  const data = await response.json();

  if (data.status !== 'OK') {
    throw new Error(`${data.errorCode}: ${data.error}`);
  }

  return data.connectionUri;
}

const connectionUri = await createConnectionUri();

const browser = await chromium.connectOverCDP(connectionUri);
const context = browser.contexts()[0];
const page = await context.newPage();
const session = await context.newCDPSession(page);

session.on('Captcha.detected', () => console.log('CAPTCHA detected'));
session.on('Captcha.waitForSolve', () => console.log('Waiting for 2Captcha'));
session.on('Captcha.solveFinished', () => console.log('CAPTCHA solved'));
session.on('Captcha.solveFailed', () => console.log('CAPTCHA solve failed'));

await session.send('Captcha.setAutoSolve', {
  autoSolve: true,
  options: [{ type: '*' }]
});

await page.goto('https://example.com');
19. Full Example: Browser API + Playwright + Manual Captcha.solve
js
import { chromium } from 'playwright';

const connectionUri = 'ws://...';

const browser = await chromium.connectOverCDP(connectionUri);
const context = browser.contexts()[0];
const page = await context.newPage();
const session = await context.newCDPSession(page);

await session.send('Captcha.setAutoSolve', {
  autoSolve: false,
  options: [{ type: '*' }]
});

await page.goto('https://example.com');
await page.waitForTimeout(5000);

const { result } = await session.send('Captcha.solve', {
  detectTimeout: 15000,
  options: [{ type: '*' }]
});

switch (result.status) {
  case 'solveFinished':
    console.log('CAPTCHA token:', result.token);
    break;

  case 'solveFailed':
    console.log('CAPTCHA solve failed:', result.errorMessage);
    break;

  case 'notDetected':
    console.log('CAPTCHA was not detected on the page');
    break;

  case 'invalid':
    console.log('Invalid solve request:', result.errorMessage);
    break;

  default:
    console.log('Unknown CAPTCHA status:', result.status);
}
20. Integration Recommendations
- Get
connectionUriviaPOST /browser/connectionrather than assembling the WebSocket URL by hand, unless you have a specific reason to. - Always pass a working proxy: via
customProxy, profile settings, browser login settings, or a 2Captcha proxy account. - For reliable isolation, use separate profiles for different scenarios.
- For scenarios where you only need the fact that the CAPTCHA was passed successfully, use auto-solve and events.
- For scenarios where you need the token, use manual
Captcha.solve. - Increase the CDP client timeout for manual CAPTCHA solving.
- Check
result.status, not just whether the CDP command returned a response. - Log the
Captcha.detected,Captcha.waitForSolve,Captcha.solveFinished, andCaptcha.solveFailedevents for diagnostics.
Working through the Dashboard
This part describes working with Browser API through the 2Captcha Dashboard: creating browser accounts and profiles, setting up proxies, getting a CDP URL, and watching sessions via Live.
1. Core logic
Browser API has two main entities: a browser account and a browser profile.
A browser account stores shared settings: login, password, proxy, country, and total traffic usage across all profiles of that account.
A browser profile is a separate browser session within an account. Each profile has its own CDP URL, status, traffic usage, request count, and Live link.
The simplest way to think about it:
text
Browser account = shared settings and credentials
Browser profile = a specific session to run
CDP URL = the connection address to the profile from Playwright / Puppeteer
Live = visual view of a specific profile
The typical process looks like this:
text
1. Create a browser account
2. Choose how it will work with a proxy
3. Use the Default profile or create additional profiles
4. Copy the CDP URL of the desired profile
5. Connect from your code or open Live
2. Browser API sections
Browser API has several main tabs.
Browser Accounts tab
This is where browser accounts are created, and cards of already-created accounts are displayed.
On this tab you can:
- create a browser account;
- choose a proxy for the account;
- create an account without a proxy to set it up later;
- view the account's login and password;
- copy the CDP URL of the selected profile;
- open Live;
- create additional profiles;
- go to active profiles;
- change proxy settings or country;
- delete profiles or the account.
Browser Profiles tab
This is where browser profiles are displayed.
You can view:
- the overall list of profiles;
- the list of profiles for the selected browser account.
On this tab you can work with specific profiles: check status, copy the CDP URL, open Live, check traffic, and delete profiles.
Connection Setup tab
Here you can choose connection parameters and get a code sample.
Sample code is available for:
- Puppeteer;
- Playwright Node.js;
- Playwright Python;
- Playwright Java;
- Playwright .NET.
Documentation tab
The section describing Browser API.
Proxy tab
The section for managing proxies and traffic.
2.1. Demo account for a first look
To get a first look at Browser API, you don't need to immediately create your own browser account and set up a proxy. At the start, the Browser Accounts section has a demo browser account named Default browser account, with a Default profile.
You can use this account to quickly see how a CDP connection works and what a browser session looks like in Live.
To try the demo account:
- Open the Browser API → Browser Accounts section.
- Find the demo account in the list of accounts.
- In the CDP URL block, select the Default profile.
- Click Live.
- Make sure the remote browser session opens.
The demo account works through a free IPv6 proxy without any additional setup. This is enough for a first look at the Live view and the general logic of CDP connections, but IPv6 has limitations.
Some sites may:
- not support IPv6;
- load unreliably;
- show a connection error;
- block IPv6 traffic;
- fail to load some resources;
- behave differently than through a regular IPv4 proxy.
If a site doesn't open through the demo account, this doesn't necessarily mean there's a problem with Browser API. The specific site may simply not work with IPv6 or may restrict this type of connection.
For full-fledged work with the sites you need, create your own browser account and set up a suitable proxy for it:
- 2Captcha Proxy — if you want to use a 2Captcha proxy account and choose the connection country;
- Custom Proxy — if you want to connect an external HTTP, HTTPS, or SOCKS5 proxy;
- No proxy on the account — if you plan to pass the proxy later when creating a profile or in the connection URL.
The demo account is recommended only for an initial check of the interface, the Live view, and understanding how a browser session works.
3. Creating a browser account
A browser account is created on the Browser Accounts tab.
On the left is the Create Account form. On the right is the list of already-created accounts.
When creating an account, you need to choose a proxy option:
text
1. 2Captcha Proxy
2. Custom Proxy
3. No Proxy
After the account is created, its card with basic information appears on the right.
4. Creating an account with a 2Captcha proxy
This option is used when you need to work through a 2Captcha proxy.
Before creating the account, make sure proxy traffic is paid for and available.
Steps:
- Open the Browser Accounts tab.
- In the Create Account form, enter the account name.
- Leave automatic password generation on, or enable Set custom password.
- In the proxy mode, select 2Captcha Proxy.
- In the Proxy Account field, select the proxy account you need.
- Choose the country.
- Click Create.
After creation, the browser account will be configured for the selected proxy account and country.
The account card will display browser and proxy information: login, password, traffic used, proxy account, geography, the CDP URL of the selected profile, and the Live link.
If the account uses a 2Captcha proxy, you can change the account's country.
5. Creating an account with a custom proxy
This option is used when you need to connect an external proxy.
Steps:
- Open the Browser Accounts tab.
- Enter the account name.
- Leave automatic password generation on, or set your own password.
- In the proxy mode, select Custom Proxy.
- Fill in the proxy fields:
- protocol;
- host;
- port;
- login;
- password.
- Click Create.
After creation, the account will appear on the right in the list of accounts.
The proxy block on the account card will show the custom proxy.
Examples of proxies with authentication:
text
HTTP
http://login:password@proxy.example.com:3128

SOCKS5
socks5://login:password@proxy.example.com:1080
If the proxy doesn't require authentication, you can leave the login and password blank, provided this option is supported by the settings.
6. Creating an account without a proxy
You can create an account without a proxy if you plan to add one later.
Steps:
- Open the Browser Accounts tab.
- Enter the account name.
- Leave automatic password generation on, or set your own password.
- Select the no-proxy option.
- Click Create.
Such an account can be used as a template.
A proxy can be added later:
- by changing the account settings;
- by creating a profile with separate proxy settings;
- via the CDP URL, if the proxy is passed in the connection URL.
For more on passing a custom proxy via the CDP URL, see section 13.
If proxy inheritance is disabled for a profile and no other proxy is set, the interface shows a warning. Currently, a free IPv6 proxy is used when no proxy is passed in the URL, but this fallback will be disabled. Configure a proxy in advance or pass one in the connection URL.
7. Browser account card
After the account is created, its card is displayed on the right on the Browser Accounts tab.
The account card contains basic browser information:
- account name;
- login;
- password;
- total traffic used across all profiles of the account;
- proxy settings;
- the CDP URL of the selected profile;
- the CDP URL copy button;
- the Live link;
- profile selector for connecting;
- the number of activated profiles (profiles created via CDP URL generation start counting after the first connection);
- the Create Profiles button;
- the Active Profiles link;
- the Delete Profiles button;
- the edit and delete account buttons.
From the account card you can:
text
Copy the CDP URL of the selected profile
Open Live for the selected profile
Change proxy settings
Change the country, if a 2Captcha proxy is used
Create additional profiles
Go to active profiles
Delete all profiles of the account
Delete the account
8. Default profile
When a browser account is created, a Default profile is automatically created.
It's there so that right after creating the account you can:
- copy the CDP URL;
- open Live;
- connect to the browser from your code.
When additional profiles are created, they appear in the profile selector on the account card. After that, you can select the profile you need and open Live specifically for it.
In the web interface, the Default profile can be deleted if the account has another profile. The account's only or last remaining profile cannot be deleted.
9. Active profiles
The account card has an Active Profiles link.
It opens the Browser Profiles tab and shows the profiles of the selected account.
This section shows only activated profiles. If a list of CDP URLs was generated through bulk profile generation, such profiles will appear here only after the first successful connection.
You can also go to the Browser Profiles tab via the top menu.
The display logic is as follows:
text
Account selected on the left → profiles of that account are shown on the right
No account selected → the overall list of profiles is shown on the right
10. Creating profiles from the account card
Additional profiles are needed when you require several separate browser sessions.
For example:
- for parallel runs;
- for different workers;
- for different tasks;
- for different countries;
- for different proxies;
- to isolate sessions from each other.
To create profiles:
- Open the Browser Accounts tab.
- Find the account you need.
- Click Create Profiles.
- Specify the number of profiles.
- If needed, override the proxy for the profiles being generated. By default they inherit the account's proxy settings; if needed, you can set a different mode:
- 2Captcha Proxy — select the proxy account and country;
- Custom Proxy — fill in the proxy parameters.
- Generate the list of CDP URLs.
- Copy the result.
- Pass the CDP URLs into your code or save them somewhere.
Important: copy the generated URLs right away. After the generation window is closed, profiles that were not activated by a connection are not saved and do not end up in the database. Such profiles are not counted toward the profile limit.
A profile is considered activated after the first connection via its CDP URL. Only then is it created in the database, starts showing up in the "Active Profiles" section, and is counted in the profile counter.
The simple rule:
text
Generate the URL → copy it immediately → use it or save it.11. Browser profile card
On the Browser Profiles tab, each profile is displayed as a separate card in the list. If no browser account is selected on the left, the overall list of all profiles is shown; if an account is selected, the list is filtered to show only the profiles of that account.
The profile card contains the profile's basic information:
- status;
- number of requests;
- traffic used;
- creation date;
- proxy information;
- CDP URL;
- the CDP URL copy button;
- the Live link;
- deleting a specific profile.
You can also delete all profiles belonging to the selected browser account if you need to clear the list. The delete button is shown only when a browser account is selected.
The profile card is used when you need to work with a specific session rather than the whole account.
12. Creating a profile from the "Browser Profiles" tab
A new profile can be created for the selected browser account.
When creating a profile, you need to choose the proxy settings.
Available options:
text
1. Inherit settings from the browser account
2. Use a 2Captcha proxy
3. Use a custom proxy
4. No proxy, with inheritance disabled
When a profile is created from this tab, it is created immediately and saved to the database right away, so it immediately appears in the profile list and counts toward the profile limit.
By comparison: when generating a list of profiles via the Create Profiles function (Bulk Generate), only CDP URLs are created. Such a profile will get into the database, appear in the Active Profiles section, and start counting toward the limit only after the first connection via its CDP URL.
Inherit from the browser account
The profile uses the same proxy settings as the browser account.
This is a convenient option if all profiles of the account should work the same way.
2Captcha Proxy
The profile uses a 2Captcha proxy.
You need to choose:
- a proxy account;
- a country.
This option is suitable if a specific profile needs to use different settings than the browser account.
Custom Proxy
The profile uses an external proxy.
You need to fill in the fields:
- protocol;
- host;
- port;
- login;
- password.
If the proxy does not require authentication, the login and password fields can be left empty.
Such a profile will use its own proxy even if the browser account has different settings configured.
The actual exit country is determined by the external proxy itself. The country displayed on the profile card may not match the connection's actual geolocation.
No Proxy
You can disable proxy inheritance and create a profile without a proxy.
Currently, a free IPv6 proxy is used when no proxy is passed in the URL. This fallback will be disabled, so configure a proxy for stable operation. See section 6 for details.
13. CDP URL
The CDP URL is the WebSocket URL used to connect to a browser profile.
You can get the CDP URL in two places:
text
1. On the browser account card — for the selected profile
2. On a specific profile's card — on the "Browser Profiles" tab
The CDP URL is used in Playwright, Puppeteer, and other clients that support the Chrome DevTools Protocol.
Format example:
text
ws://<browser_login>-zone-scraping_browser-country-<country_code>-pid-<profile_id>:<password>@cb.2captcha.com:9222If a proxy is passed in the connection URL, a proxy segment is also added to the CDP URL.
The CDP URL contains browser access credentials, so it must not be published anywhere public.
If a proxy is set at multiple levels at the same time, the following priority order applies:
- Proxy passed in the connection string (CDP URL).
- Proxy set on the profile.
- Proxy set on the account.
Example of using a custom proxy
If the proxy is passed in the connection string, the CDP URL uses not the proxy string itself but its Base64URL representation.
For example, the proxy string:
text
socks5://login:password@proxy.example.com:1080After Base64URL encoding, you get, for example:
text
c29ja3M1Oi8vbG9naW46cGFzc3dvcmRAcHJveHkuZXhhbXBsZS5jb206MTA4MAUsed when building the CDP URL:
text
ws://<browser_login>-zone-scraping_browser-country-<country_code>-pid-<profile_id>-proxy-c29ja3M1Oi8vbG9naW46cGFzc3dvcmRAcHJveHkuZXhhbXBsZS5jb206MTA4MA:<password>@cb.2captcha.com:9222Note: in Browser API, the encoding is performed automatically when the connection string is generated in the Connection Setup section, so you usually don't need to encode the proxy string manually.
14. Live
Live opens a visual view of the browser session.
Important: Live cannot be opened for a profile that is already in use by an active CDP connection (
profile_lockederror, see section 20, "Limits and Storage," for details). For Live, use a free profile or wait for the existing connection to finish.
If a profile or account is deleted while a CDP connection is active, the already-open browser session will keep running until the current connection ends. In that case, reconnecting to this profile via the same CDP URL is not possible.
A profile can be updated while a CDP connection is active. The already-running session will continue using its previous settings until the current connection ends.
Live can be opened:
- from the browser account card;
- from a specific profile's card.
If the account has several profiles, first select the profile you need on the account card, then open Live.
Live is useful when you need to check:
- whether the page opened;
- what content the browser sees;
- whether a CAPTCHA appeared;
- whether a click worked;
- where a redirect went;
- why an element wasn't found;
- which proxy was applied;
- whether the browser is stuck loading.
15. Connection Setup
On the Connection Setup tab you can get a code sample for connecting.
Steps:
- Open the Connection Setup tab.
- Select the browser account.
- Choose the proxy type.
- If 2Captcha Proxy is selected, choose the proxy account and country.
- If Custom Proxy is selected, fill in the standard fields: protocol, host, port, login, and password.
- Choose the code sample you need.
- Copy the code.
Samples are available for:
text
Puppeteer
Playwright Node.js
Playwright Python
Playwright Java
Playwright .NET
This section is convenient when you need to quickly get a connection template without manually assembling the CDP URL.
16. Quick scenario: account with a 2Captcha proxy
- Open Browser Accounts.
- Enter the account name.
- Select 2Captcha Proxy.
- Choose the proxy account.
- Choose the country.
- Click Create.
- On the account card, select the Default profile.
- Copy the CDP URL or open Live.
- Use the CDP URL in Playwright or Puppeteer.
17. Quick scenario: account with a custom proxy
- Open Browser Accounts.
- Enter the account name.
- Select Custom Proxy.
- Fill in the protocol, host, port, login, and password.
- Click Create.
- On the account card, select the Default profile.
- Copy the CDP URL or open Live.
18. Quick scenario: account without a proxy
- Open Browser Accounts.
- Enter the account name.
- Select the no-proxy option.
- Click Create.
- Add a proxy later via the account settings, a profile, or the connection URL.
Currently, the profile uses a free IPv6 proxy when no proxy is passed in the connection URL. This fallback will be disabled.
19. Quick scenario: multiple profiles for parallel work
- Create a browser account.
- Make sure the proxy is configured correctly.
- On the account card, click Create Profiles.
- Specify the number of profiles.
- Generate the list of CDP URLs.
- Copy the result immediately.
- Pass each CDP URL to a separate worker or process.
- After the first connection, the profiles become active.
- Active profiles can be managed on the Browser Profiles tab.
Recommendation:
text
One profile = one independent session
One CDP URL = one worker or one task
Reconnecting to an already-occupied profile is not possible (profile_locked error, see section 20). Use a separate profile for each parallel process.
20. Limits and storage
- Maximum duration of a single browser session — 30 minutes.
- Profiles are stored for 90 days from creation, or until deleted by the user.
- A profile supports only one active CDP connection at a time. Attempting to reconnect to an already-occupied profile (including opening Live) returns a
profile_lockederror. Wait for the current browser session to finish, or use a different profile.
21. Quick reference
text
A browser account is created with or without a proxy.
If a 2Captcha proxy is selected, you need to choose a proxy account and country.
If a custom proxy is selected, you need to fill in protocol, host, port, login, and password.
After the account is created, a Default profile automatically appears.
The CDP URL is taken from the selected profile.
A profile supports only one active connection at a time.
Live opens for a specific profile.
Additional profiles are needed for parallel runs.
Generated profile URLs must be copied immediately.
Unactivated profiles are not saved after the generation window is closed.
On the "Browser Profiles" tab you can manage profiles individually.
On the "Connection Setup" tab you can get code for Puppeteer and Playwright.
22. Minimal pre-launch checklist
Before connecting from your code, check:
text
Browser account created
Proxy configured
Country selected, if using a 2Captcha proxy
Profile created, or Default profile selected
CDP URL copied in full
Different profiles used for parallel tasks
Live opened to check browser state if there are issues


