hCaptcha Recognition: bypass using grid method
2Captcha is hCaptcha solver.
We are pleased to announce the latest updates in the Grid method for solving captcha using our captcha recognition service. In this article, we will look in details at how to use the updated API to bypass the hCaptcha. This is useful if the hCaptcha challenge can not be solved using token method.
The changes in the Grid method are made to provide a captcha-type targeted recognition approach with higher accuracy and reduced recognition time achieved by combining human power with computer vision.
What is hCaptcha?
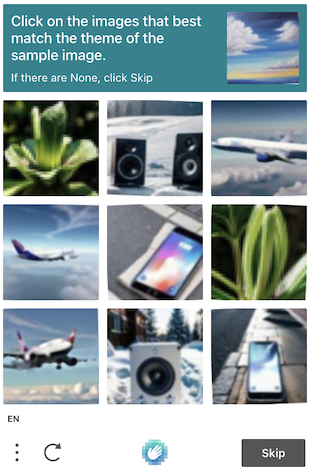
hCaptcha is a CAPTCHA protection that uses different types of challenges to verify that the user is a human. In this article we cover the case when the challenge is a grid containing 9 images, which users should select according to the task description.
What's new in the API?
Now the Grid method accepts an additional parameter imgType that is used to target the request to a proper recognition pipeline according to the CAPTCHA type. For hCaptcha you must set it's value to hcaptcha.
How to solve the hCaptcha using the Grid method?
We can divide the process into following steps:
- Clicking the checkbox
- Collecting the task data
- Interacting with the API
- Clicking the grid tiles
To click the checkbox and tiles you can use the corresponding methods of your favorite browser automation framework.
In the article we focus on the steps 2 and 3.
Collecting the data
The hCaptcha grid challenge consist of:
- nine image tiles
- optional task image
- task text
We can get all the image nodes with 'div.image:not([role="img"])' selector inside the captcha challenge frame. The last 9 nodes are the tiles we need to "glue" it together to get a bigger image with 3x3 grid. The first one, if presented, is the optional task image.
Below is what it looks like.
The 9 tiles glued together

The optional task image

To get the task text get the h2 element using the selector 'h2.prompt-text' and the innerText of the element. Make sure your browser is using English language as we expect the task text is in English.
In our sample the text is:
Click on the images that best match the theme of the sample image.Below we provide a JavaScript function that can help you extract the data properly. You can inject this code into the captcha iframe after you click the captcha checkbox. Then, call the getCaptchaData function once the captcha task is visible. The function returns a Promise that is resolved with the Object containing the following properties:
type- the API task type:GridTaskorCoordinatesTask. In the article we cover theGridTaskcasebody- the tiles glued together, or the whole task canvas forCoordinatesTasktype as base64 stringcomment- the task textimgInstructions- optional task image as base64 string
Helper function call example:
try {
    let data = await getCaptchaData()
    console.log(JSON.stringify(data))
} catch (e) {
    console.error(e)
}
Hepler function code
class Tile {
    constructor(el) {
        this.url = el.style['backgroundImage'].slice(5, -2)
        this.width = el.clientWidth
        this.height = el.clientHeight
        this.img = new Image(this.width, this.height)
        this.img.setAttribute('crossorigin', 'anonymous')
    }
    load(ctx, index = 0, vOffset = 0) {
        return new Promise((resolve) => {
            let pos = [
                { x: 0, y: 0 }, { x: ctx.canvas.width / 3, y: 0 }, { x: ctx.canvas.width / 3 * 2, y: 0 },
                { x: 0, y: ctx.canvas.height / 3 }, { x: ctx.canvas.width / 3, y: ctx.canvas.height / 3 }, { x: ctx.canvas.width / 3 * 2, y: ctx.canvas.height / 3 },
                { x: 0, y: ctx.canvas.height / 3 * 2 }, { x: ctx.canvas.width / 3, y: ctx.canvas.height / 3 * 2 }, { x: ctx.canvas.width / 3 * 2, y: ctx.canvas.height / 3 * 2 }
            ]
            this.img.addEventListener('load', () => {
                ctx.drawImage(this.img, pos[index].x, vOffset + pos[index].y)
                resolve(this.img)
            })
            this.img.src = this.url
        })

    }
}

const getMaxTileSize = (nodes) => {
    return nodes.reduce((m, c) => {
        return {
            width: !m.width || c.clientWidth > m.width ? c.clientWidth : m.width,
            height: !m.height || c.clientHeight > m.height ? c.clientHeight : m.height
        }
    })
}

const getCaptchaData = () => {
    return new Promise((resolve, reject) => {
        let canvas, taskCanvas, result = {}
        const imgNodes = Array.from(document.querySelectorAll('div.image:not([role="img"])'))
        const comment = document.querySelector('h2.prompt-text').innerText

        if (imgNodes.length < 9) {
            const srcCanvas = document.querySelector('canvas')
            let tmpcanvas = document.createElement('canvas')

            tmpcanvas.width = srcCanvas.clientWidth
            tmpcanvas.height = srcCanvas.clientHeight
            let tmpctx = tmpcanvas.getContext('2d')

            tmpctx.drawImage(srcCanvas, 0, 0, srcCanvas.width, srcCanvas.height, 0, 0, tmpcanvas.width, tmpcanvas.height)
            tmpctx.font = "18px sans-serif";
            tmpctx.fillText(comment, 4, 20, tmpcanvas.width - 8);
            let promises = []

            imgNodes.forEach((imgNode, i) => {
                const tile = new Tile(imgNode, tmpctx)
                promises.push(tile.load(tmpctx, i, imgNode.clientHeight / 4))
            })

            Promise.all(promises).then(() => {
                result = {
                    comment,
                    body: tmpcanvas.toDataURL().replace(/^data:image\/?[A-z]*;base64,/, ''),
                    type: 'CoordinatesTask'
                }
                resolve(result)
            })
        } else if (imgNodes.length >= 9) {
            result.type = 'GridTask'
            result.comment = comment
            const maxTileSize = getMaxTileSize(imgNodes)
            const tileNodes = imgNodes.filter(n => (n.clientWidth >= maxTileSize.width && n.clientHeight >= maxTileSize.height))
            canvas = document.createElement('canvas')
            canvas.width = maxTileSize.width * 3
            canvas.height = maxTileSize.height * 3
            let ctx = canvas.getContext('2d')

            let promises = []

            tileNodes.forEach((tileNode, i) => {
                const tile = new Tile(tileNode, ctx)
                promises.push(tile.load(ctx, i))
            })

            Promise.all(promises).then(() => {
                result.body = canvas.toDataURL().replace(/^data:image\/?[A-z]*;base64,/,'')
            })

            if (imgNodes.length > 9) {
                const maxTileSize = getMaxTileSize(imgNodes)
                const [taskNode] = imgNodes.filter(n => (n.clientWidth < maxTileSize.width && n.clientHeight < maxTileSize.height))
                taskCanvas = document.createElement('canvas')
                taskCanvas.width = taskNode.clientWidth
                taskCanvas.height = taskNode.clientHeight
                let taskCtx = taskCanvas.getContext('2d')
                const taskTile = new Tile(taskNode, taskCtx, 0)
                taskTile.load(taskCtx).then(() => {
                    result.imgInstructions = taskCanvas.toDataURL().replace(/^data:image\/?[A-z]*;base64,/, '')
                })
            }
            resolve(result)
        } else {
            reject(`Unknown captcha type. Image nodes count: ${imgNodes.length}`)
        }
    })
}
Result example
{
    "type": "GridTask",
    "comment": "Click on the images that best match the theme of the sample image.",
    "imgInstructions": "iVBORw0KGgoAAA...",
    "body": "iVBORw0KGgoAAAA..."
}
Interacting with the API
Once we have all the required data, we can make a request to the API to solve our captcha task. Use the data extracted on previous step, add the imgType parameter set to hcaptcha and indicate the number of columns and rows, in our case it is set to 3.
Method: POST
API endpoint: https://api.2captcha.com/createTask
Task parameters
| Parameter | Type | Required | Description |
|---|---|---|---|
| type | String | Yes | The task type must be set to GridTask |
| imgType | String | Yes | Must be set to hcaptcha |
| body | String | Yes | Image in base64 format with the task tiles glued together |
| comment | String | Yes | The task text in English |
| rows | Number | Yes | The number of rows, in our case: 3 |
| columns | Number | Yes | The number of columns, in our case: 3 |
| imgInstructions | String | No | Additional task image (when provided) in base64 format |
Request body example
{
    "clientKey":"YOUR_API_KEY",
    "task": {
        "type": "GridTask",
        "imgType": "hcaptcha",
        "body": "iVBORw0KGgoAAAA...",
        "comment": "Click on the images that best match the theme of the sample image.",
        "rows": 3,
        "columns": 3,
        "imgInstructions": "iVBORw0KGgoAAA..."
    }
}
Result example
{
    "errorId": 0,
    "status": "ready",
    "solution": {
        "click": [
            3,
            4,
            7
        ]
    },
    "cost": "0.0012",
    "ip": "1.2.3.4",
    "createTime": 1692863536,
    "endTime": 1692863556,
    "solveCount": 1
}
Use the click method of your browser automation framework to click on the corresponding tiles. The selector for tiles is 'div.task'. Please note that the array of nodes is numerated from 0 and in our API answer the tiles are numerated from 1 to 9. In our example we click in the tiles using pure JavaScript:
document.querySelectorAll('div.task')[3-1].click()
document.querySelectorAll('div.task')[4-1].click()
document.querySelectorAll('div.task')[7-1].click()
You can also use our libraries to quickly implement the method into your code.
Code examples for libraries
Ruby
result = client.grid({
  method: 'base64',
  key: 'your_api_key',
  recaptcha: 1,
  json: 1,
  recaptchacols: 3,
  recaptcharows: 3,
  img_type: 'hcaptcha',
  textinstructions: 'lease click on all entities similar to the following silhouette',
  imginstructions: Base64.encode64(File.read('path/to/hint.jpg')),
  body: Base64.encode64(File.read('path/to/captcha.jpg')),
  previous_id: 0
})
Python
result = solver.grid( method='base64',
                     body = 'base64',
                     key='your_api_key',
                     recaptcha=1,
                     json=1,
                     recaptchacols=3,
                     recaptcharows=3,
                     img_type='hcaptcha',
                     textinstructions='Please click on all entities similar to the following silhouette',
                     imginstructions=base64.b64encode(open('path/to/hint.jpg', 'rb').read()).decode('utf-8'),
                     previous_id=0)